This is part of a series on Building an Azure Dev Test Lab for software development.
This is a summary of how to migrate from an Active Directory (AD) on premises system to Azure Cloud, how to migrate Active Directory users and groups to Azure using AD Cloud Sync, how to use a single sign-on for AD and Azure, how to enable Multi Factor Authentication (MFA) for Azure authentication and set some appropriate security policies for MFA.
Information Required for the Migration
- Active Directory User Principal Name (UPN): example: *.corp.domain.com - listed in Active Directory Domains and Trusts
- List of Active Directory Users to Migrate to Azure
- List of Active Directory Groups to Migrate to Azure
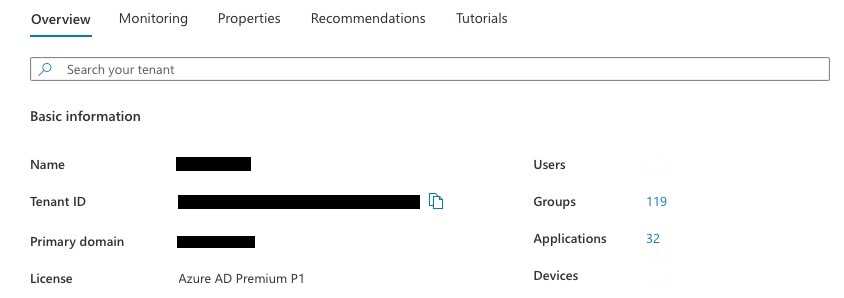
- Azure Primary Domain example: webdomain.com - listed in Azure Active Directory, Overview
Prepare Active Directory for Migration
Prepare the Active Directory UPN Suffix to Match the Azure Primary Domain
To find out the Azure Primary domain, navigate to the Azure Active Directory portal, in the Overview tab, which should list the Azure Primary domain. For example: webdomain.com.
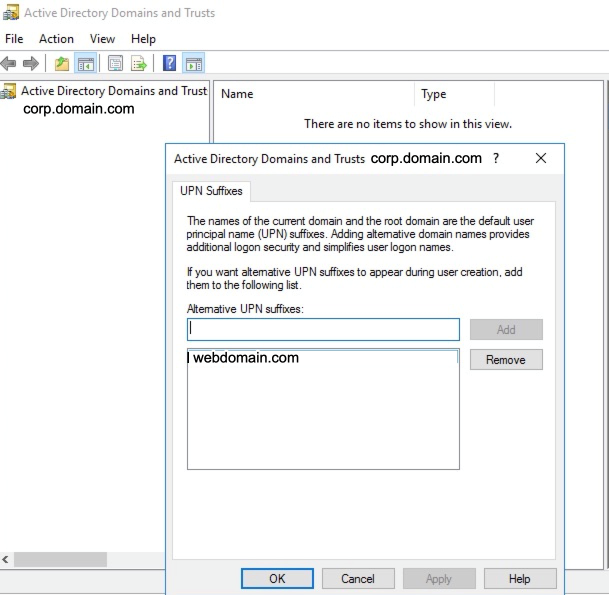
To find out the Active Directory UPN, on the domain controller, launch the Active Directory Domains and Trusts, select the domain, right click properties to list the UPN Suffixes. For example, corp.domain.com.
By convention, the UPN should map to the user email name. But, if an AD and Azure system have been setup with different values, these must be resolved before migrating to Azure.
If the UPN Suffix does not match the Azure Primary domain, add a new UPN suffix with the exact name as the Azure Primary domain, for example: *.webdomain.com.
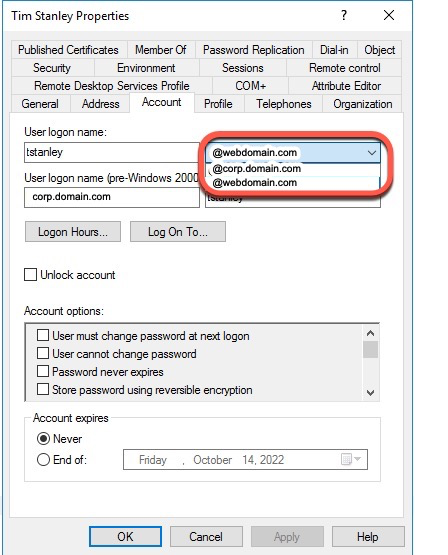
Now modify all users and set their UPN Suffix to the same name as the UPN Suffix just added, which must be the same as the Azure Primary domain.
On the domain controller, launch Active Directory users and computers, select the user, right click, select properties, and select the Account tab. The User logon name will have a dropdown listing the UPN suffixes that can be selected.
When any new user is added, the UPN suffix must be set to the same value as the Azure Primary domain.
A Powershell script can also be run on the domain controller to update the user UPN suffix.
$LocalUsers = Get-ADUser -Filter {UserPrincipalName -like '*corp.domain.com'} -Properties userPrincipalName -ResultSetSize $null
$LocalUsers | Select userPrincipalName,Name,SamAccountName
$LocalUsers | foreach {$newUpn = $_.UserPrincipalName.Replace("corp.domain.com","webdomain.com"); $_ | Set-ADUser -UserPrincipalName $newUpn}
$LocalUsers = Get-ADUser -Filter {UserPrincipalName -like '*webdomain.com'} -Properties userPrincipalName -ResultSetSize $null
$LocalUsers | Select userPrincipalName,Name,SamAccountName
Set Each users Active Directory Email property
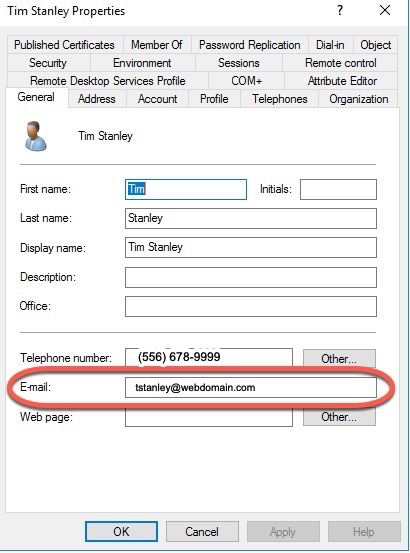
Each user must have an email property defined that matches the Azure / Office 365 email address that will match.
On the domain controller, launch Active Directory users and computers, select the user, right click, select properties, and select the General tab. The User Email property must be set. For example user@webdomain.com.
When configuring the user, I also recommend configuring any office or mobile phone numbers, and addresses in the Telephones and Address tabs. These Active Directory properties set on the domain controller will get pushed to Azure (AD is the primary source for this information).
Prepare Active Directory Using the IdFix tool
Once the users UPN and email Active Directory properties are set, the next step is to run the IdFix tool.
Microsoft recommends running the IdFix tool on Active Directory to prepare for migration to Azure. Download the MSI, install it, and run the IdFix tool. https://github.com/microsoft/idfix [1]
IdFix is used to perform discovery and remediation of identity objects and their attributes in an on-premises Active Directory environment in preparation for migration to Azure Active Directory. IdFix is intended for the Active Directory administrators responsible for directory synchronization with Azure Active Directory.
The purpose of IdFix is to reduce the time involved in remediating the Active Directory errors reported by Azure AD Connect. Our focus is on enabling the customer to accomplish the task in a simple expedient fashion without relying upon subject matter experts.
The Microsoft Office 365 IdFix tool provides the customer with the ability to identify and remediate object errors in their Active Directory in preparation for deployment to Azure Active Directory or Office 365. They will then be able to successfully synchronize users, contacts, and groups from the on-premises Active Directory into Azure Active Directory.
Create an OU to be Synced with Azure
On the domain controller using Azure Users and Computers app, create a new OU Container "AzureADConnect". This will be used when AD Cloud Sync is configured. Add a Users and Groups OU under AzureADConnect.
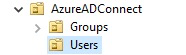
Move all users identified in the information gathering phase that will have both AD and Azure logins under the Users OU.
Move all security groups identified in the information gathering phase that will be used in both AD and Azure to the Groups OU.
Configure AD Cloud Sync
Prepare Azure for Migration
Azure AD Cloud Sync replaces the old Azure AD Sync tool. Azure AD Cloud Sync is much simpler to configure and install. Refer to Prerequisites for Azure AD Connect cloud sync [7] for more details.
Disable Any Existing AD Sync
Disable the Connect sync scheduler by opening an admin PowerShell prompt and running
Stop-ADSyncSyncCycle
Set-ADSyncScheduler -SyncCycleEnabled $false
Stop the Connect-related services and change their startup type from Automatic (Delayed Start) to Disabled
Microsoft Azure AD Sync
- Azure AD Connect Health Sync Insights Service
- Azure AD Connect Health Sync Monitoring Service
Disable any monthly password rotation scheduled task
Install AD Cloud Sync
Download the agent from your Azure portal at Azure AD Connect cloud sync [4]
Refer to the Microsoft instructions on Install the Azure AD Connect provisioning agent [5]
I recommend letting the AD Cloud Sync installer select the gMSA account. If you install AD Cloud Sync on two systems, I recommend letting the installer select the gMSA account.
Once the AD Cloud Sync is installed, it will be listed on the site Azure AD Connect cloud sync [4] on the tab On-premises provisioning agents.
Configure Conditional Access Policies
Microsoft outlines information on conditional access policies here:
The following types of conditional access policies are recommended:
- Internal user - enforce MFA (Require multifactor authentication for all users)
- External user - enforce MFA (Require multifactor authentication for guests)
- IP Location
Azure Conditional access policies are defined at Conditional Access [8]
IP Location based policies are used when a business has a static IP at an office location, and the company wants to create a policy that the "IP Location" acts as the MFA. This makes using Azure more user friendly when working at a company office location.
When an external MFA user from an outside Office 365 organization enrolls in an MFA, their primary email configured as a guest must match their exact UPN on their Office 365 system, not an alias.
Creating a conditional access policy requires an Azure AD Premium P1 license. Refer to the Microsoft Conditional Access overview above for more detailed information.
Below are the steps to create a conditional access policy for External users. Create a Create A New Policy from a template. Select "Require multifactor authentication for guest access"
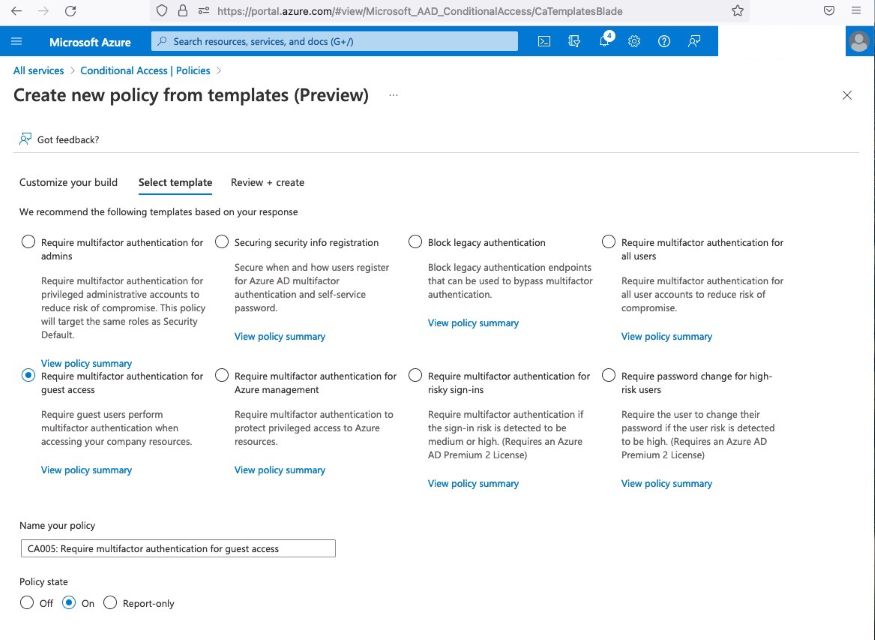
Set the Policy state to On to have the policy immediately take affect. Do not turn the policy on until your users have been informed how to enroll in MFA. Select next, on the Review + create, you will need to set Enable security defaults to No.

There are currently two legacy Azure administrative options available to enforce MFA. These are older options prior to Microsoft publishing conditional access policies and these may go away at some point. Do not enable or enforce MFA using these options until the users have been informed on how to enroll in MFA.
User/Service Multi-Factor Authentication Settings
The link for these two options is at: Azure, Users, Per User MFA [9]
Select the Users tab, select the user, Enable MFA. Once enabled, the next logon from the user will require MFA enrollment. The terms are slightly confusing, "Enable MFA" actually means enforce on next logon.
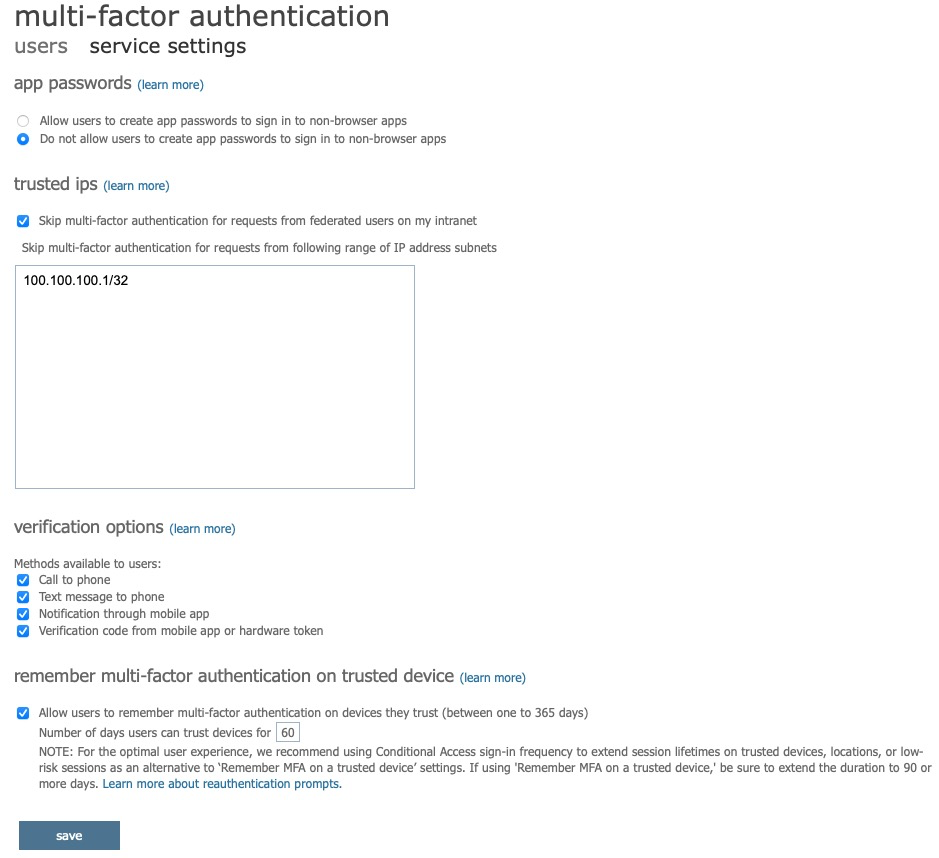
To specify an IP Location where MFA is not required, select the service settings tab. Recommended settings are:
- app passwords: Do not allow users to create app passwords to sign in to non-browser apps.
- trusted ips: skip muti-factor authentication for request from federated users on my intranet (specify an IP range such as 100.100.100.100/32).
- verification options: enable all options
- remember multi-factor authentication on trusted device: allow users to remember multi-factor authentication on devices they trust: 60 days.
Enrolling Users in MFA
Users need to be informed ahead of time how to enroll in MFA so that when MFA enforcement is turned on, they know how to quickly update their account and login using MFA. Users can quickly navigate to the Microsoft user account security info tab by using the following url: https://aka.ms/MFASetup [10]
Resources:
- [1] https://github.com/microsoft/idfix
- [2] https://beznett.com/how-to-add-a-new-email-domain-upn-suffix-to-active-directory/
- [3] https://learn.microsoft.com/en-us/azure/active-directory/cloud-sync/how-to-prerequisites?tabs=public-cloud
- [4] https://portal.azure.com/#view/Microsoft_AAD_Connect_Provisioning/ProvisioningManagementBlade
- [5] https://learn.microsoft.com/en-us/azure/active-directory/cloud-sync/how-to-install
- [6] https://learn.microsoft.com/en-us/azure/active-directory/conditional-access/overview
- [7] https://learn.microsoft.com/en-us/azure/active-directory/conditional-access/concept-conditional-access-policy-common
- [8] https://portal.azure.com/#view/Microsoft_AAD_ConditionalAccess/ConditionalAccessBlade/~/Policies
- [9] https://account.activedirectory.windowsazure.com/usermanagement/multifactorverification.aspx
- [10] https://aka.ms/MFASetup