Blog
Building An Azure Dev Test Lab - Azure Devops Migration
This is part of a series on Building an Azure Dev Test Lab for software development.
This is a summary of how to migrate from an on-site Microsoft Team Foundation Server (TFS), aka Visual Studio Team Services, aka Azure Devops Server to Azure Git repositories. This article does not cover topics of Azure automated builds, automated tests, or automated deployments. These same steps would apply if migrating to GitHub Enterprise.
- TFS Terms
- Information Required for Migration from TFS to Git
- Identify all the TFS Collections and Projects to be exported to git
- Decide the git branch to TFS branch name mapping
- Download and Install Git-TFS
- Decide which branches to export
- Decide how much history to preserve
- Decide if TFS to git mirroring is required
- Decide what to do about binaries in source control
- Decide a default Azure working path
- Information Required to configure Azure Devops Git
- Identify new Active Directory Security Groups and naming conventions
- Identify new Azure Git Projects and naming conventions
- Identify new Azure Security Groups
- Identify new Azure Git Project Group Names
- Decide in what region your Azure Devops organization is to be hosted.
- Define a Git Branching Strategy
- Decide How to handle Git Training
- Performing TFS to Git Migration
- To extract TFS to a Local Git Repository All Branches
- To extract TFS to a Local Git Repository Specific Branch
- To extract TFS to a Local Git Repository Specific Change-set
- Create a new Azure organization
- Create a new Azure or Git Project.
- Create a new Azure Git Repository
- Push the Local Git Repository to the Cloud
- To mirror a TFS repository to Git
- Add a .gitconfig
- Azure Devops Go Live checklist
- Azure Devops or GitHub Enterprise
- Azure Devops Work Items Migration Tools
- References
The scope of this article is limited to source control. The migration of TFS Work items is not supported by the git-tfs tool.
Microsoft has many names for TFS that are all the same services, just a different name at one point in time. I use the name TFS to refer this product.
- Microsoft TFS Server
- Visual Studio Team Services (VSTS)
- Azure Devops Server
TFS Terms
TFS uses the term "Collections" as the highest organization level that corresponds to the Azure git repository term "Projects".
TFS uses the term "Projects" that correspond to Azure git "Repositories" aka repos. An TFS "Project" and a git "Repository" exist underneath a TFS "Collection" or an Azure git "Project".
Information Required for Migration from TFS to Git
Identify all the TFS Collections and Projects to be exported to git
Pick one non mission critical small to medium size TFS Project to migrate to Azure Devops git first. If you run into issues, you can always start the export migration process again. This allows you to get something working and get experience on all the steps before trying to tackle larger more complex TFS Projects.
After identifying the first TFS project to export, prioritize any active collections and project that need to be migrated first, and inactive ones last. Using the history in TFS can show what activity has occurred and when. The general recommendation would be to export every TFS Collection, so that TFS can be shut down when the work is complete
Migrating one collection at a time allows you to get moving forward with Azure without a long calendar time to do so. If you need to run a dual repository scenario (both TFS and git active at the same time), you can run a script on a recurring basis to mirror from TFS to git.
Decide the git branch to TFS branch name mapping
Decide a git default branch naming convention such as main (recommended) or master. Set your local default git user configuration to use the correct default name [1]. This needs to be done and configured before you run git-tfs.
Download and Install Git-TFS
The git tool git-tfs [2][3] can be used to export TFS change history to git.
Note: It is best to use git-tfs on a client that is on the exact same local area network as the TFS server. When exporting large projects, timeouts can occur if using a remote TFS server. It is also best if that client is a virtual machine that can be dedicated for use to mirror from TFS to git while repositories while migration is underway.
Note: git-tfs will create a git change-set for each TFS change-set. This git-tfs change-set will contain the TFS collection, project, and TFS change-set as part of a comment added to the git change-set. This is very helpful in determining where a repository was migrated from.
Decide which branches to export
The general recommendation would be to export every project, and branch in a TFS collection. Exporting every project and branch in a collection is going to take longer to export from TFS, and the git repository may be large.
Note: exporting a large TFS project using git-tfs with 20,000 changes might take two-three days to create a local git repository the first time.
The git to TFS tool cannot export a branch that's been renamed. The git-tfs list-remote-branches command will list branches that it is able to export, and you can use that information for your planning.
git tfs list-remote-branches http://tfs:8080/tfs/DefaultCollection
If TFS is using a folder instead of a branch, the folder can be modified to become a branch in TFS and then exported using git-tfs.
The tool TFS to git can export all branches, or a single branch, but there does not appear to be a way to export multiple branches.
Decide how much history to preserve
History is usually very important to find out what happened, when, and by whom. The recommendation would be to preserve all history where possible.
If your exported repository with all changes is too big, you may need to limit history to the most recent set of changes (for example the last year), instead of exporting all history. If you decide to limit history, you will need to identify which specific change-set to use for exporting on each project.
Decide if TFS to git mirroring is required
Git-tfs supports the ability to mirror any TFS changes to a git repository on a regular basis. Git-tfs mirroring is recommended and a good way to get a read-only copy of source into git and verify all change history and changes migrate first.
⚠️ Warning: git-tfs mirroring only worked one way (TFS to Git). I was not able to make two-way round-trip mirroring from git back to TFS work. At the time I performed migration (2022), any changes to a git repository used for TFS to Git mirroring, broke the mirroring capability.
I was able to take a git-tfs repository and create a new git branch and make changes to it on the git side without breaking TFS mirroring to git. I could then use git merge to merge the changes from the main TFS branch into a development branch in git. This allowed the TFS and git repositories to be used at the same time on different branches. If using this approach, don't expect the git branch to ever migrate into TFS and expect TFS mirroring to work.
Decide what to do about binaries in source control
Git is great for storing text files efficiently and quickly, but using it to store binary files (releases, dll references, etc.), make the repository grow large quickly, and that takes longer to transfer on clone / pull operations. Instead of storing binaries, using a Nuget server, Azure artifact storage, Azure file storage, or Git-LFS are the preferred options for storing binaries.
Decide a default Azure working path
While it is strongly recommend not to embed paths into source control, there are some Microsoft tools or systems that require a path (configuration files, test suites, etc.). Standardizing the path for all developers and build systems is the only way to solve this until those tools and configurations can all handle relative paths.
Example standardized azure path:
C:\Azure\organization\project\repository
Information Required to configure Azure Devops Git
Identify new Active Directory Security Groups and naming conventions
I use the following security group naming convention for Azure.
Pattern: -. * DSG - Domain Security Group (set at the AD domain level, and mirrored to Azure) * ASG - Azure Security Group (set at the Azure group level) * AZDO - Azure Devops group (set at a git repository level) * Security Group Name * TFS Collection or Azure Project Name * .Team - Read/Write permissions * .ReadOnly - Read Only permissions * .Admin - Administrator permissions
DSG-.Team - Defined at Active Directory Level in AD ASG-.Team - Defined at Azure Level in Azure AZDO-.Team defined at the level AZDO-.Read Only defined at the level
Identify new Azure Git Projects and naming conventions
When migrating, from TFS to git it can be helpful for users to have similar names that correspond to the old TFS names, such as:
- A git project name with a name or abbreviation similar to the TFS Collection
- A git repository name with a name or abbreviation similar to the TFS Project
Identify new Azure Security Groups
It is strongly recommended and encouraged that almost always users should never be assigned direct permissions to an Azure project or repository. Instead, assign permissions to groups and then assign users to those groups.
⚠️ Warning: In 2022, Azure Devops only supports one level of group assignment. It does not support hierarchical groups.
Some suggested group conventions:
- Use a region in the group name: ASG-.Team, i.e. ASG-DEV-US.Team, ASG-DEV-EMEA.Team for all developers in the US or all developers in Europe, Middle East, and Asia.
- Separate contractors from employees, i.e. ASG-DEV-Employees.Team, ASG-DEV-Contractors.Team
Identify new Azure Git Project Group Names
It is suggested to create project groups and assign those to the appropriate Azure role permissions instead of assigning user directly to Azure roles. This will make it easier in the future to manage permissions. AZDO-.Admin defined at the level AZDO-.Team defined at the level AZDO-.ReadOnly defined at the level
Decide in what region your Azure Devops organization is to be hosted.
📝 Note all Azure services are available in all regions. Before you create your Azure Devops organization, review the capabilities for you region. Likewise, not all regions have the same cost structure.
Refer to the List of Azure Regions [4] for more details about where they are located and what they can provide before selecting where your Azure Devops organization will be hosted.
Define a Git Branching Strategy
There is much debate about what is the best strategy for branches and it's a hotly debated item.
A branching strategy for a GitHub Open-Source project needs to restrict who can check in code, make sure a pull request builds properly, and needs to be reviewed carefully before allowing it got be pushed upstream.
A small company with few team members, on the other hand, needs to be as efficient as possible. A strategy with a single branch and all releases being pulled off the main branch and hot fixes built from a _releases_release branch is probably more suitable for that company than something for an open-source project.
The term Trunk Based Development [5] has been used to describe a git branching strategy to avoid git merge hell. Trunk Based Development describes itself as:
A source-control branching model, where developers collaborate on code in a single branch called ‘trunk’ *, resist any pressure to create other long-lived development branches by employing documented techniques. They therefore avoid merge hell, do not break the build, and live happily ever after.
Microsoft has published some of their tips on how to Select an effective branching strategy [6]
Microsoft also has published some tips on How Microsoft plans with DevOps [7], and on Git Branching Guidance [19]
After doing a bit of research, I came to a conclusion of the following branch strategy.
main– builds from here, this is always the tip for most current developmentreleases/{name}– builds from hereusers/{username}/{description}- no builds from here, users can sharefeatures/{name}– no builds from here
Decide How to handle Git Training
Git is similar to other source control systems. Visual Studio 2022 provides several UI integrations that make TFS UI operations done on TFS very similar to the kind of operations needed in git. VS 2022 UI git integrations, in my opinion, make the training curve much simpler.
Having a regional goto person in the same time zone to ask git questions can also be helpful to team members. Git merges and resolving merge conflicts can be intimidating the first time.
There are multiple links at git-scm.com, and youtube that provide extensive information for git.
Performing TFS to Git Migration
The git tfs list-remote-branches command is used to list all branches that can potentially be exported. Convert any TFS folder to branches if they are not listed.
git tfs list-remote-branches http://tfs:8080/tfs/DefaultCollection
⚠️ Warning: A branch that has been renamed in TFS usually cannot be exported by git-tfs.
Target branch is always main (or git default) Do this on a machine that is on the same network as the TFS server or timeouts will occur. git-tfs will put changeset comments for git commits in all changesets pulled from TFS
To extract TFS to a Local Git Repository All Branches
The git-tfs clone command may take several hours or days.
$tfsCollection = "Collection"
$tfsProject = "Project"
$tfsBranch = "Main"
$tfsproject="`$/$tfsCollection/$tfsProject/$tfsBranch"
$tfsurl="https://tfs.corp.domain.com:443/tfs/$tfsCollection"
$azOrganization="azorg"
$dest="C:\Azure\\$azOrganization\$tfsCollection\$tfsProject"
git-tfs clone --with-labels --branches=all $tfsurl $tfsproject $dest
cd $dest
git tfs bootstrap
To extract TFS to a Local Git Repository Specific Branch
git-tfs clone --with-labels https://tfs.corp.domain.com:4443/tfs/Collection $/Project/Branch C:\Azure\{organization}\{project}\{repo}
📝 Note: The git-tfs clone command will create a default branch on the local repository.
To extract TFS to a Local Git Repository Specific Change-set
git-tfs clone --with-labels --from 21263 https://tfs.corp.domain.com:4443/tfs/Collection $/Project/TFS-Branch
C:\Azure\{organization}\{project}\
📝 Note: The git-tfs clone command will create a default branch on the local repository. The local repository branch will be the git default (main or master), and that will not match the TFS branch your pulling from.
Create a new Azure organization
If you have not already, use Azure Devops to create a new Azure Devops organization. The Azure Devops Link https://dev.azure.com has an option to create a multiple new organizations in your Azure tenant. Make sure you know what regions you want your new Azure Devops organization hosted in before you create the organization.
Create a new Azure or Git Project.
Within the organization, create a new Azure Git Project. An Azure Devops Project can contain multiple repositories. Once the repository is created, create the new repository groups (AZDO-.Team, .ReadOnly, .Admin) and assign those groups to the appropriate roles.
Create a new Azure Git Repository
Within the Azure Devops Project, create a new Azure Git repository. It will inherit the Azure Git Project permissions.
⚠️ Warning: Do not create a
readme.mdfile for the repository at the Azure cloud level or this will cause a merge which will break TFS to git mirroring.
Push the Local Git Repository to the Cloud
Once the cloud repository is configured and roles and groups are assigned, the local git-tfs repository can be pushed to the cloud. This should be done on the same client workstation where the git-tfs clone command was executed.
The url used for the push can be found on the Azure repository clone repo tab.
git remote add origin https://domain@dev.azure.com/organization/project/_git/repo
git push -u origin --all
To mirror a TFS repository to Git
Below are the general overall steps to run a script on a scheduled basis to mirror from TFS to git. The git-tfs pull and git push commands perform the heavy lifting, the other steps are there just to show diagnostic information.
git-tfs pull --branches=auto
# Switch to branch to push
git checkout $Branch
# Show status
git status
git push -u origin --all --verbose
# Show branches
git branch -a --verbose"
If you need to perform development on a git branch 'main-dev' while TFS to git mirroring is being done on 'main', you can use the git merge command to merge changes from the main branch into main-dev.
git checkout main
git pull
git checkout main-dev
git pull
git merge main
Once TFS to git migration is complete, and mirroring is no longer required. Those changes in main-dev can be merged back into the main branch.
Add a .gitconfig
TFS only tracks files added to TFS. Git tracks all files added to a folder, unless an entry in the .gitconfig says to ignore it. To inform git of which configs to add, a .gitconfig file needs to be added to a project. If using a c-sharp project, use a c-sharp .gitconfig as the starting point. That prevents some of the visual studio build files and folder (such as /bin or /obj) from getting checked in.
Azure Devops Go Live checklist
It's helpful to have a go-live checklist before having users switch over to git. Below are some suggestions.
- Add .gitconfig to all repositories and all active branches
- Test builds from git before turning off tfs to git mirroring.
- Validate all users have appropriate permissions to Git repositories.
- Set TFS to block checkins on all roles (all users, administrators, services, build agents).
- Turn off TFS to Git replication for all repositories
Azure Devops or GitHub Enterprise
Everything in this article covers migration specific to Azure Devops. But what about GitHub Enterprise services? GitHub Enterprise provides similar services to Azure Devops. Both are owned by Microsoft. What should one use? The answer will probably vary over time.
Microsoft purchased GitHub Enterprise in 2018 [12]. Few companies can afford to keep two products that perform the same business function, so the question is which one will win over time. So far, Microsoft seems to be providing a long term role for both.
As of 2022, new features such GitHub Security features [15] as GitHub Advanced Security [16], Dependabot [17], and GitHub CoPilot [18] are not available in Azure. These are additional features in GitHub that require additional subscription costs.
Azure Devops and GitHub have different pedigrees. is focused on Open Source and Azure Devops on Enterprise source control management.
An organization that has Visual Studio Professional Licensing gets Azure Devops licensing included. As of 2022, Those same users have to pay additional license fees to use GitHub Enterprise for source control. That additional cost makes GitHub Enterprise a harder leap for organizations with a Visual Studio License already. GitHub Enterprise in 2022 provides SAML Azure integration, but it's not as seamless as the Azure Devops group integration with Azure.
Azure Devops Work Items Migration Tools
From my research, migration of TFS work items to git is significantly more complex than migrating source code projects. naked Agility has published Azure DevOps Migration Tools [13] to help migrate work items from TFS to Azure or Github.
References
- [1] https://about.gitlab.com/blog/2021/03/10/new-git-default-branch-name/
- [2] https://git-tfs.com
- [3] https://github.com/git-tfs/git-tfs
- [4] https://azure.microsoft.com/en-us/explore/global-infrastructure/geographies/#overview
- [5] https://trunkbaseddevelopment.com
- [6] https://docs.microsoft.com/en-us/azure/devops/repos/tfvc/branching-strategies-with-tfvc?view=azure-devops
- [7] https://docs.microsoft.com/en-us/azure/devops/learn/devops-at-microsoft/release-flow
- [8] https://www.red-gate.com/blog/why-to-use-git-instead-of-tfs-tfvc
- [9] https://jessitron.com/2012/12/11/tfs-and-git-a-comparison/
- [10] https://docs.microsoft.com/en-us/devops/develop/git/migrate-from-tfvc-to-git
- [11] https://docs.microsoft.com/en-us/devops/develop/git/centralized-to-git
- [12] https://www.linkedin.com/pulse/azure-devops-future-after-github-acquisition-microsoft-antonio-alvino/
- [13] http://nkdagility.github.io/azure-devops-migration-tools/#support
- [14] https://github.com/nkdAgility/azure-devops-migration-tools/blob/master/docs/index.md
- [15] https://github.com/features/security/
- [16] https://docs.github.com/en/get-started/learning-about-github/about-github-advanced-security
- [17] https://docs.github.com/en/code-security/dependabot/working-with-dependabot
- [18] https://github.com/features/copilot
- [19] https://learn.microsoft.com/en-us/azure/devops/repos/git/git-branching-guidance?view=azure-devops
Related Items
Building an Azure Dev Test Lab - Authentication
This is part of a series on Building an Azure Dev Test Lab for software development.
This is a summary of how to migrate from an Active Directory (AD) on premises system to Azure Cloud, how to migrate Active Directory users and groups to Azure using AD Cloud Sync, how to use a single sign-on for AD and Azure, how to enable Multi Factor Authentication (MFA) for Azure authentication and set some appropriate security policies for MFA.
Information Required for the Migration
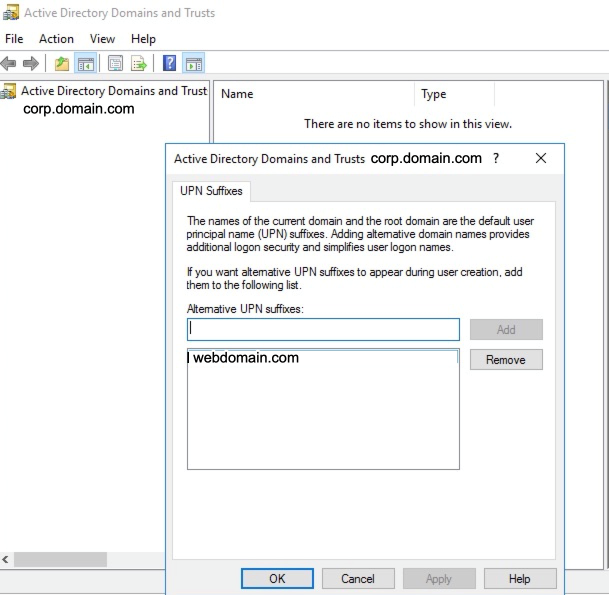
- Active Directory User Principal Name (UPN): example: *.corp.domain.com - listed in Active Directory Domains and Trusts
- List of Active Directory Users to Migrate to Azure
- List of Active Directory Groups to Migrate to Azure
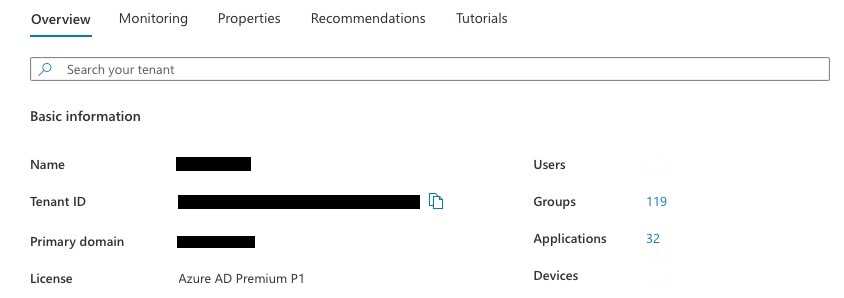
- Azure Primary Domain example: webdomain.com - listed in Azure Active Directory, Overview
Prepare Active Directory for Migration
Prepare the Active Directory UPN Suffix to Match the Azure Primary Domain
To find out the Azure Primary domain, navigate to the Azure Active Directory portal, in the Overview tab, which should list the Azure Primary domain. For example: webdomain.com.
To find out the Active Directory UPN, on the domain controller, launch the Active Directory Domains and Trusts, select the domain, right click properties to list the UPN Suffixes. For example, corp.domain.com.
By convention, the UPN should map to the user email name. But, if an AD and Azure system have been setup with different values, these must be resolved before migrating to Azure.
If the UPN Suffix does not match the Azure Primary domain, add a new UPN suffix with the exact name as the Azure Primary domain, for example: *.webdomain.com.
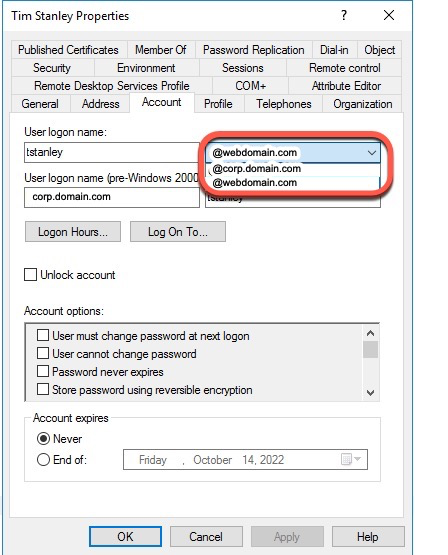
Now modify all users and set their UPN Suffix to the same name as the UPN Suffix just added, which must be the same as the Azure Primary domain.
On the domain controller, launch Active Directory users and computers, select the user, right click, select properties, and select the Account tab. The User logon name will have a dropdown listing the UPN suffixes that can be selected.
When any new user is added, the UPN suffix must be set to the same value as the Azure Primary domain.
A Powershell script can also be run on the domain controller to update the user UPN suffix.
$LocalUsers = Get-ADUser -Filter {UserPrincipalName -like '*corp.domain.com'} -Properties userPrincipalName -ResultSetSize $null
$LocalUsers | Select userPrincipalName,Name,SamAccountName
$LocalUsers | foreach {$newUpn = $_.UserPrincipalName.Replace("corp.domain.com","webdomain.com"); $_ | Set-ADUser -UserPrincipalName $newUpn}
$LocalUsers = Get-ADUser -Filter {UserPrincipalName -like '*webdomain.com'} -Properties userPrincipalName -ResultSetSize $null
$LocalUsers | Select userPrincipalName,Name,SamAccountName
Set Each users Active Directory Email property
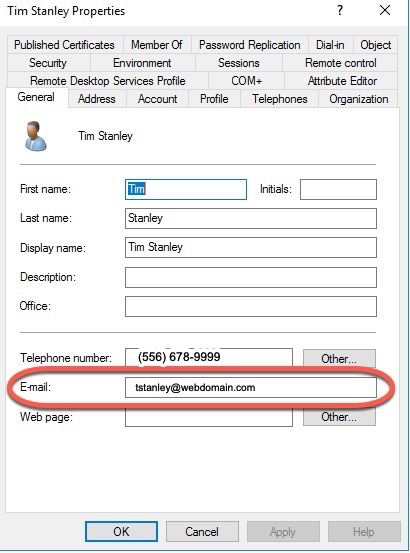
Each user must have an email property defined that matches the Azure / Office 365 email address that will match.
On the domain controller, launch Active Directory users and computers, select the user, right click, select properties, and select the General tab. The User Email property must be set. For example user@webdomain.com.
When configuring the user, I also recommend configuring any office or mobile phone numbers, and addresses in the Telephones and Address tabs. These Active Directory properties set on the domain controller will get pushed to Azure (AD is the primary source for this information).
Prepare Active Directory Using the IdFix tool
Once the users UPN and email Active Directory properties are set, the next step is to run the IdFix tool.
Microsoft recommends running the IdFix tool on Active Directory to prepare for migration to Azure. Download the MSI, install it, and run the IdFix tool. https://github.com/microsoft/idfix [1]
IdFix is used to perform discovery and remediation of identity objects and their attributes in an on-premises Active Directory environment in preparation for migration to Azure Active Directory. IdFix is intended for the Active Directory administrators responsible for directory synchronization with Azure Active Directory.
The purpose of IdFix is to reduce the time involved in remediating the Active Directory errors reported by Azure AD Connect. Our focus is on enabling the customer to accomplish the task in a simple expedient fashion without relying upon subject matter experts.
The Microsoft Office 365 IdFix tool provides the customer with the ability to identify and remediate object errors in their Active Directory in preparation for deployment to Azure Active Directory or Office 365. They will then be able to successfully synchronize users, contacts, and groups from the on-premises Active Directory into Azure Active Directory.
Create an OU to be Synced with Azure
On the domain controller using Azure Users and Computers app, create a new OU Container "AzureADConnect". This will be used when AD Cloud Sync is configured. Add a Users and Groups OU under AzureADConnect.
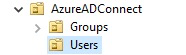
Move all users identified in the information gathering phase that will have both AD and Azure logins under the Users OU.
Move all security groups identified in the information gathering phase that will be used in both AD and Azure to the Groups OU.
Configure AD Cloud Sync
Prepare Azure for Migration
Azure AD Cloud Sync replaces the old Azure AD Sync tool. Azure AD Cloud Sync is much simpler to configure and install. Refer to Prerequisites for Azure AD Connect cloud sync [7] for more details.
Disable Any Existing AD Sync
Disable the Connect sync scheduler by opening an admin PowerShell prompt and running
Stop-ADSyncSyncCycle
Set-ADSyncScheduler -SyncCycleEnabled $false
Stop the Connect-related services and change their startup type from Automatic (Delayed Start) to Disabled
Microsoft Azure AD Sync
- Azure AD Connect Health Sync Insights Service
- Azure AD Connect Health Sync Monitoring Service
Disable any monthly password rotation scheduled task
Install AD Cloud Sync
Download the agent from your Azure portal at Azure AD Connect cloud sync [4]
Refer to the Microsoft instructions on Install the Azure AD Connect provisioning agent [5]
I recommend letting the AD Cloud Sync installer select the gMSA account. If you install AD Cloud Sync on two systems, I recommend letting the installer select the gMSA account.
Once the AD Cloud Sync is installed, it will be listed on the site Azure AD Connect cloud sync [4] on the tab On-premises provisioning agents.
Configure Conditional Access Policies
Microsoft outlines information on conditional access policies here:
The following types of conditional access policies are recommended:
- Internal user - enforce MFA (Require multifactor authentication for all users)
- External user - enforce MFA (Require multifactor authentication for guests)
- IP Location
Azure Conditional access policies are defined at Conditional Access [8]
IP Location based policies are used when a business has a static IP at an office location, and the company wants to create a policy that the "IP Location" acts as the MFA. This makes using Azure more user friendly when working at a company office location.
When an external MFA user from an outside Office 365 organization enrolls in an MFA, their primary email configured as a guest must match their exact UPN on their Office 365 system, not an alias.
Creating a conditional access policy requires an Azure AD Premium P1 license. Refer to the Microsoft Conditional Access overview above for more detailed information.
Below are the steps to create a conditional access policy for External users. Create a Create A New Policy from a template. Select "Require multifactor authentication for guest access"
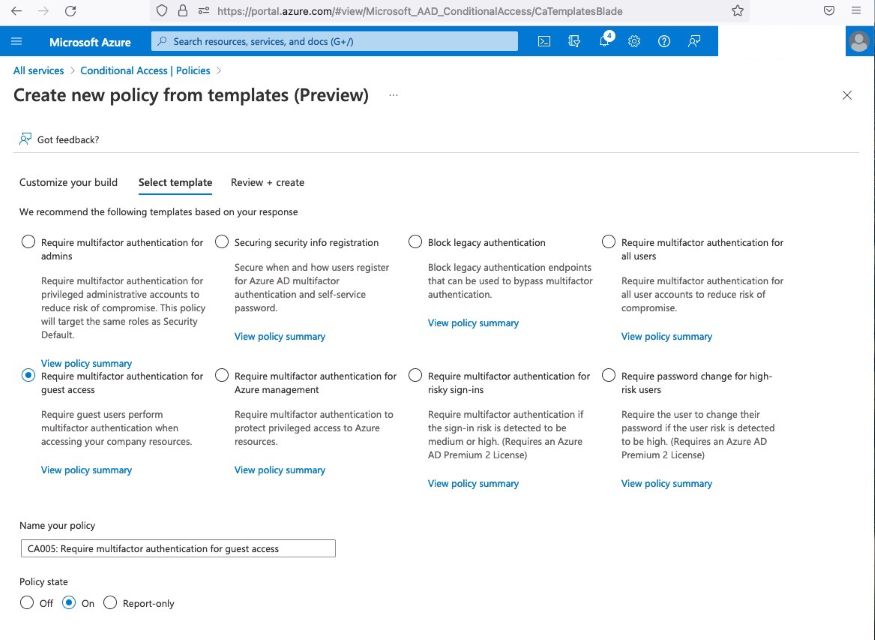
Set the Policy state to On to have the policy immediately take affect. Do not turn the policy on until your users have been informed how to enroll in MFA. Select next, on the Review + create, you will need to set Enable security defaults to No.

There are currently two legacy Azure administrative options available to enforce MFA. These are older options prior to Microsoft publishing conditional access policies and these may go away at some point. Do not enable or enforce MFA using these options until the users have been informed on how to enroll in MFA.
User/Service Multi-Factor Authentication Settings
The link for these two options is at: Azure, Users, Per User MFA [9]
Select the Users tab, select the user, Enable MFA. Once enabled, the next logon from the user will require MFA enrollment. The terms are slightly confusing, "Enable MFA" actually means enforce on next logon.
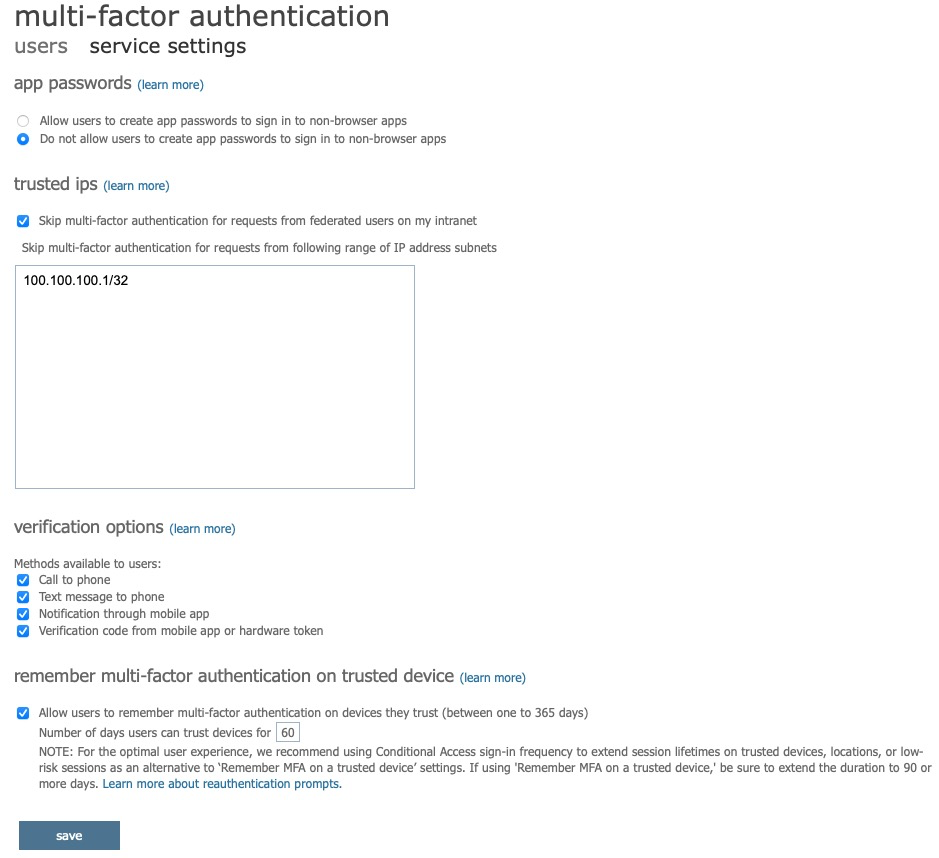
To specify an IP Location where MFA is not required, select the service settings tab. Recommended settings are:
- app passwords: Do not allow users to create app passwords to sign in to non-browser apps.
- trusted ips: skip muti-factor authentication for request from federated users on my intranet (specify an IP range such as 100.100.100.100/32).
- verification options: enable all options
- remember multi-factor authentication on trusted device: allow users to remember multi-factor authentication on devices they trust: 60 days.
Enrolling Users in MFA
Users need to be informed ahead of time how to enroll in MFA so that when MFA enforcement is turned on, they know how to quickly update their account and login using MFA. Users can quickly navigate to the Microsoft user account security info tab by using the following url: https://aka.ms/MFASetup [10]
Resources:
- [1] https://github.com/microsoft/idfix
- [2] https://beznett.com/how-to-add-a-new-email-domain-upn-suffix-to-active-directory/
- [3] https://learn.microsoft.com/en-us/azure/active-directory/cloud-sync/how-to-prerequisites?tabs=public-cloud
- [4] https://portal.azure.com/#view/Microsoft_AAD_Connect_Provisioning/ProvisioningManagementBlade
- [5] https://learn.microsoft.com/en-us/azure/active-directory/cloud-sync/how-to-install
- [6] https://learn.microsoft.com/en-us/azure/active-directory/conditional-access/overview
- [7] https://learn.microsoft.com/en-us/azure/active-directory/conditional-access/concept-conditional-access-policy-common
- [8] https://portal.azure.com/#view/Microsoft_AAD_ConditionalAccess/ConditionalAccessBlade/~/Policies
- [9] https://account.activedirectory.windowsazure.com/usermanagement/multifactorverification.aspx
- [10] https://aka.ms/MFASetup
Related Items
Building an Azure Dev Test Lab - Why Azure
This is part of a series on Building an Azure Dev Test Lab for software development.
What is Azure and why use it?
What Is Azure?
Azure is more than a marketing term. Today (2023), Azure has grown to ~487 categorized services (some duplicates) to cover a large range of business services.
- General (18)
- Compute (28)
- Networking (24)
- Storage (15)
- Web (16)
- Mobile (3)
- Containers (7)
- Databases (21)
- Analytics (15)
- AI + machine learning (26)
- Internet of things (25)
- Mixed reality (2)
- Integration (26)
- Identity (23)
- Security (23)
- Devops (8)
- Migration (8)
- Monitor (11)
- Management and governance (27)
- Intune (4)
- Hybrid + multicloud (15)
- Other (132)
Focus Business Resources on the Primary Business
Small companies don't have the overhead to hire teams of people just to manage infrastructure. When you migrate to Azure, you have a team of people that manage the security, infrastructure, wiring, power, internet connections, monitor and fix hardware, for all your Azure services. Yes, some amount of time from business resources are needed to create users, set permissions, set policies, but the additional people (or hours) needed to manage everything is all covered by the Azure hosting fees. Microsoft can scale and achieve productivity at a scale small and medium business can't touch.
Availability and Reliability
Microsoft provides between 99.9% to 99.99% Service Level Agreement (SLA) depending on the service tier [4]. Free services have no SLA. Availability of 99.9% translates into a maximum downtime of 8 hours and 46 minutes over the course of a year and 99.99% translates into a maximum downtime of about 53 minutes per year.
Hidden On Premises Costs Covered by Azure
Real estate, buildings, building maintenance, property taxes, electrical costs HVAC costs, hardware amortization, are all covered by the costs of the Azure fees. Because the Azure systems are done at a large scale, there is significant cost savings compared to what a small or medium business could do standalone. Azure also provides the ability to scale systems almost instantly, thus saving time. Doing that with physical hardware takes time.
Standards Compliance
In today's world, there are numerous standards and compliance rules and policies organizations need to adhere to ranging from government regulations to industry guidelines. Global organizations delivering services to customers in multiple parts of the world have varying rules and regulations to follow. The Azure Security portal provides the heavy lifting and supporting documentation to help an organization begin the process to comply with those standards, including PCI, EU GDPR, SOC (1, 2, 3) and numerous others. The Azure Compliance Center [5], [6] provides over 100 compliance regulations for over 50 countries and regions. Companies still must ensure the solutions they deliver comply with those standards, but the Azure systems provide all the supporting documentation to ensure a company's hosted services are all in compliance.
Innovation and Leveraging New Technology
Imagine if you wanted to change all your web servers overnight to support .Net 7.0 what a large effort that would be. When Microsoft released .Net 7.0, the day of the announcement, Azure services were hosting .Net 7.0. Azure has had a very good track record of providing new features at a very fast pace.
Taxes and Financial Considerations
Traditional US Accounting rules required that when real estate, buildings, hardware equipment all had to be depreciated over the life of the equipment. That requires funding up front, and it can (usually) only be written off over time. By utilizing cloud-based services, a company can write off 100% of the expense in the year it is incurred. The term shifting from CAPEX to OPEX [3] is used to describe this.
Automation / DEVOPS
Microsoft has geared its entire infrastructure not just around a portion of what is needed to provide a web-based set of software services, but every single end to end detail from authentication, source control, static code analysis, testing, deployment, scalability, all at a scale we have never seen before in the software industry. By providing all the tooling for automating all those steps along the way, this can reduce costs, reduce the time to market, and increase overall quality.
Summary
Azure provides a wide range of infrastructure and services to cover software and services at a scale few companies can afford to own their own. By using that scale, it allows business to use their own people to focus on business problems and leverage the Azure systems and the supporting teams to provide those services. Azure provides extremely reliable Service Level Agreements, that even most small and medium business would struggle to achieve. Azure provides all the supporting documentation to help companies achieve regional, country, and industry standards. Azure provides new features regularly and rapidly. Companies can leverage other people's real estate, hardware, and employees by using, and take advantage of tax laws to improve financial scenarios when compared to an in-house data center. And lastly, Azure provides an end-to-end eco-system for automating all the steps of the software development and deployment process.
References
- [1] https://www.forbes.com/sites/forbestechcouncil/2021/03/12/why-migrate-to-the-cloud-the-basics-benefits-and-real-life-examples/?sh=2e3b7e275e27
- [2] https://learn.microsoft.com/en-us/azure/cloud-adoption-framework/strategy/motivations
- [3] https://learn.microsoft.com/en-us/azure/cloud-adoption-framework/strategy/financial-considerations/
- [4] https://azure.microsoft.com/en-us/support/legal/sla/summary/
- [5] https://azure.microsoft.com/en-us/explore/trusted-cloud/compliance/
- [6] https://azure.microsoft.com/en-us/resources/azure-enables-a-world-of-compliance/
Related Items
Migrating to .Net7
On November 8, 2022, Microsoft released .Net 7. After getting Visual Studio Professional 17.4 installed, updating to .Net 7 was fairly painless.
Changing the obligatory TargetFramework entry in all the projects:
<TargetFramework>net7.0</TargetFramework>
Updating the package references from 6.0.0 to 7.0.0:
<PackageReference Include="Microsoft.Extensions.Hosting" Version="7.0.0" />
Updating the github action yml file to use the new dotnet version:
dotnet-version: '7.0.x'
Azure even had all the website hosting ready so I didn't have to wait for anyone to deploy .Net 7. Microsoft does list some incompatabilities in .Net 7, but it's not a long list. This has probably been the easiest migration since .net46 to .net48.
References
Related Items
Building an Azure Dev Test Lab Series
Microsoft has a very large quantity of documentation on Azure. But most of those articles are focused on new large-scale production scenarios or migrating existing production scenarios to Azure. For a software development firm that is looking only to leverage Azure for software development and testing, and not expose public web services to the internet, where does one start?
The Microsoft documentation that I've read leads one to believe that it's a simple as just creating an Azure VM or an Azure Web service and you're done. The reality is there is much more infrastructure required to do that. This series attempts to put together a roadmap or summary of some solutions aimed solely toward software development for Enterprise services and applications. You may find it helpful for preparing your Azure migration or if you have some services in Azure extending it.
Assumptions
Azure is a big world. To narrow down the scope of things, I'm going to create a narrow set of assumptions to build a development and test lab in Azure.
- Software development teams are distributed in multiple locations in Europe, Asia, and the United States.
- There is an existing Windows on premises Active Directory system in place for Authentication.
- There is an existing Windows network system in place in at least three physical locations / offices.
- There is an existing Wide Area Network system in place between the physical locations / offices.
- There are existing file shares / network shares in place for software distribution and storage.
- The software development team utilizes Visual Studio 2022 Professional.
- There is an extremely large source code base in Microsoft Team Foundation Server.
- The development lab utilizes Microsoft Hyper-V Virtual Machines for dev / test servers.
- There is an extremely large code base of web-based services used for an Enterprise Suite of applications.
- Microsoft Office 365 (hosted in the cloud) is used throughout the company for email and team communication.
- All remote access to Azure systems requires Multi Factor Authentication.
- No "production" and no "public" facing websites, databases, or services.
- For Dev Test Labs, no load balancing or hot failover and no region failover.
Articles
- Building an Azure Dev Test Lab - Why Azure
- Building an Azure Dev Test Lab - Authentication
- Building an Azure Dev Test Lab - Azure Devops Migration
- Building an Azure Dev Test Lab - Data Centers
- Building an Azure Dev Test Lab - Networking
- Building an Azure Dev Test Lab File Shares
- Building an Azure Dev Test Lab App Services
- Building an Azure Dev Test Lab Virtual Machines
- Building an Azure Dev Test Lab Remote Access
- Building an Azure Dev Test Lab Azure SQL
Related Items
Migrating To .Net6 and Azure
In 2022, I decided to make a significant update the the code base and hosting platform used by this site. I decided to migrate to .Net 6 and host it on Azure.
I could have taken the old site to Azure, but I wanted to start with a cleaner code base. I removed some of the old dependencies, libraries and assumptions to lighten up as much as possible. A general list of the new requirements:
- Store content as XML or JSON.
- Do not require the use of a database.
- Provide support for as much of the original content as possible.
- Remove dependencies on third party packages as possible.
The main course of effort was the original site was written in ASP.Net Web forms. The new site was written in ASP.Net Core Razor pages in C#.
Some interesting points:
- Start: 2022 06 10
- End: 2022 07 31
- 32 days of working changes, a few hours on nights & weekends
- Occurred over 50 calendar days
- The equivalnet of about 15-20 full time equivalent working days
- 15,552 Lines of Source Code
- 4,438 Lines of Executable Code
- Go Live: 2022 08 28
Here is a summary of some of the key points of the new site:
- Developed using Visual Studio 2022
- Targets .Net 6
- ASP.Net Core Razor Pages
- Content / object model is all XML based
- Supports pages, posts, tags, categories, authors, and site statistics
- Uses Azure DNS
- Uses Azure App Services / an Azure Website for hosting the site
- Uses GitHub Azure integrations to publish software updates to Azure
- Uses prism.js for code formatting
- Uses tinymce for content editing
- Uses bootstrap for a CSS styling.
- Some moving parts were greatly influenced by Miniblog.Core. This site is not a derivative of Miniblog.Core, but I did use some of the ideas as a base for this sites code base.
- The Table Of Content generator leverages the HtmlAgilityPack
A few things about Azure I learned along the way.
Pick carefully what Azure Datacenter you want for hosting. Not all Azure Datacenters have the same features, or the same pricing and you cannot easiliy mix parts from other Azure Datacenters. For example, once your publishing a site from Github to Azure, moving that Azure Website to another Azure DataCenter basically requires configuring everything back from scratch.
Using an Azure Static Website is really for a "static" site. A dynamic site that runs ASP.Net Core isn't suited for a Azure Static Website.
Using GitHub actions to publish to Azure is a timesaver. However, each action stores the result as storage, and if your not careful, very quickly you will exceed the 500 MB storage limit for "free" GitHub repositories.
Azure App Services provide several layers of scalability for the Azure Hosting Plans.
Using Azure App Services / Azure Websites for a Developer Lab Instance provides a free hosting service (F1), an SSL certificate, and is extremely helpful for go live preparation. The D1 service plan provides the bare bones minimum to host a non azure domain name.
You can't get an SSL certificate (even if you buy one) on a custom domain name on the F1 or D1 service plan. Microsoft tells you that a B1 service plan or higher is needed.
The D1 service plan provides:
- 1 GB of memory
- 240 minutes / day compute
The D1 service plan is more than enough power to drive this website. It uses about 250-350 Mb of memory (everything is store in memory since there is no database). Because everything is stored in memory it barely uses any compute time.
The positives of moving to Azure App Services:
- Github Actions to publish to Azure is a great timesaver.
- Azure DNS is much easier to administer than other DNS services I've used.
- The minimum D1 plan is still screamingly fast.
- The Azure monitoring provides some usefull analysis tools.
The only negative I've experienced so far with Azure is that it tries to steer the creation to a default S1 plan. If you accidentally setup an S1 plan, and remove it from you site, you still pay for the plan until you remove it from the subscription. If you don't pay attention, you can quickly run up a hefty bill. Few people really need an S1 hosting plan to start a small website.
Related Items
2010 Era Blog Platform Retired
This site (tim-stanley.com) was first started in February 2006. It first went publicly live October 8, 2007. The engine used to power this site was used from 2006 to 2022. The main technology really hadn't been modified since 2010. Not bad for a sixteen year run.
In 2022, this site was updated, but this is a summary of the underlying technology that powered this site for sixteen years.
Original Site Platform
- ASP.NET 2.0
- .Net 3.5 SP 1
- Visual Studio 2008
- C#
- Windows Live Writer Build 12.0.1366.1026
- Windows Live Writer Code Snippet Plugin Code Snippet download Polaroid Picture Plugin
- XML based content
- SQLite based DB (for content and relationship data)
Original Blog Platform
The site utilized BlogEngine.Net with several Extensions. Some custom controls are used on a lot of the pages.
- Content Management System - BlogEngine.Net
- Table Of Content Generator [ tocautogen ] extension by Klaus Graefensteiner
- Most Popular Posts extension and TopPosts control by Al Nyveldt
- Copy Code To Clipboard Extension by Troy Goode
- Social Bookmarking extension by Danny Douglass
- Icons from IconGalore, FastIcon, IconDrawer, WebDesignerDepot and Artura
- Background image from AbsoluteCross.com
- Custom Control for ArchiveList - sortable grid layout of contents
- Custom Control for Contacts - allows positioning the contact information in a page instead of a specific link.
- Custom Control for Flickr Slide Show - via Paul Stamatiou
- Custom Control for Simple Viewer Photo Gallery via Airtight Interactive.com
- Custom Control for Page Includes
- Custom Control for Page Layouts
- JQuery Snapfish menus
As I developed one site, I had another, then another, then another. Before long I was spending more time applying patches / changes to the main code base and distributing it to all the sites than I was on content. That lead me to try to focus on one code base for multiple websites and that eventually led to a multi-tenant solution.
The main portions of BlogEngine.Net provided a solid basis, but it was heavily modified to support a multi-tenant blog platform. That meant some pretty significant changes to the model and code base. What was left had it's origins in BlogEngine.Net but it was pretty significantly different than BlogEngine.Net.