Blog
Visual Studio 2008 Express Free
Microsoft announced on Nov 19, 2007 the availability of Visual Studio 2008. It also made available to the public a free version of the developer tools. Check out the following links to obtain your free copy of these tools.
The Visual Web Developer version includes a significantly improved HTML web designer also used in Visual Studio 2008 and Microsoft Expression Web.
Related Items
Nikon Lens Best Values
In researching the type of lenses I wanted for a Nikon D80, I became increasingly frustrated by the type and quality of information available. User suggestions and ratings tended to focus on the most expensive lenses and ignored price. I had a limited budget, but wanted to know what would give me a good value for my budget.
I've summarized in this article what I believe as of October 2007 are very good quality lenses for very good value. I favor zoom lenses over a fixed focal length prime lens so I have a bias towards zooms. I also don't favor really wide angle lenses so I've not listed those.
Why These Lenses?
Caveat: Unless I own a specific lens, I didn't test it. I have researched the test results, reviews, and comments recommendations of others. All prices are listed as of October 2007. I own the D80, the Nikon 18-135mm f/3.5-5.6G. I also have some older pre-1972 Nikon lenses, but those are pre-AI lenses and do not fit the D80.
I've listed these lenses because in my opinion, they exhibit good value for the price range. If you read some of the news groups on lens recommendations, folks always recommend the $1600 lens. That's not my budget and I suspect it's not everyone else's either. I wanted to know if I spend a certain amount, what was the best value I could get for my money. That was is the primary reason I wrote this list. The second reason was people kept recommending lenses and I had no idea of the cost or quality.
I looked for good quality recommendations, popular lenses that if I decided to sell, others would want as well, and I also looked for lenses that retained their value. The Nikon lenses seem to retain their value very well. The prices of Nikon lenses on e-bay are sometimes higher than the price of a new lens. Unless I thought it was a very good value and highly recommended, I've listed only Nikon lenses.
I've listed the filter size because when buying multiple lenses, it's nice and more cost effective to have filters that fit multiple lenses.
All lenses listed below work on digital DX format Nikon D80 or D200 bodies. The G lenses do not have an aperture ring and so do not work on manual focus (Manual) Nikon bodies. Vibration Reduction (VR) will not work on manual focus cameras.
IQ in the tables below refers to the Image Quality ranking from SLR Gear. BR refers to the rating (1-5) provided by Bjørn Rørslett.
Nikon D40 D40x users: If you are considering one of these lenses, I would recommend you check the compatibility of the D40 or D40x to support auto focus on these lenses. The D4o and D40x support autofocus only on lenses with AF-S and AF-I which are equipped with an autofocus motor.
Budget of $250 or Less
| Description | 2007 Cost | Filter | Film | Manual | IQ | BR | Reviews |
|---|---|---|---|---|---|---|---|
| Nikon 50mm f/1.8D AF Standard Auto Focus Nikkor Lens | $109.95 | 52mm | 9.13 | 5 | Ken Rockwell SLR Gear Photodo Bjørn Rørslett Rating Nikon USA PhotoZone |
||
| Nikon 18mm - 55mm f/3.5-5.6G ED II AF-S DX | $114.95 | 52mm | 7.81 | Ken Rockwell SLR Gear Nikon USA PhotoZone |
|||
| Nikon 55mm - 200mm f/4-5.6G ED-IF AF-S DX VR | $229.95 | 52mm | 8.20 | 3.5 | Ken Rockwell SLR Gear Bjørn Rørslett Rating Nikon USA PhotoZone |
Budget of $500 or Less
| Description | Cost | Filter | Film | Manual | IQ | Reviews |
|---|---|---|---|---|---|---|
| Nikon 18mm - 135mm f/3.5-5.6G ED-IF AF-S DX | $329.95 | 62mm | 9.25 | Ken Rockwell SLRgear.com Thom Hogan Nikon USA PhotoZone |
||
| Nikon 85mm f/1.8D AF | $399.95 | 62mm | 9.50 | Ken Rockwell SLR Gear Nikon USA PhotoZone |
||
| Sigma 18-50mm f/2.8 EX DC Macro | $399.95 | 72mm | 8.83 | SLR Gear PhotoZone |
||
| Nikon 70-300mm f/4.5 - 5.6G ED-IF AF-S VR | $479.00 | 62mm | 9.13 | Ken Rockwell SLR Gear Nikon Imaging Nikon USA PhotoZone |
||
| Tamron 17-50mm f/2.8 Di II LD Asperical IF SP AF | $449.95 | 67mm | 9.14 | SLR Gear PhotoZone |
Budget of $900 or Less
| Description | 2007 Cost | Filter | Film | Manual | IQ | BR | Reviews |
|---|---|---|---|---|---|---|---|
| Nikon 18mm - 200mm f/3.5-5.6G ED IF AF-S DX VR | $769.95 | 72mm | 8.24 | 4 | Ken Rockwell SLR Gear Thom Hogan Bjørn Rørslett Rating Nikon USA PhotoZone |
||
| Nikon 80-200mm f/2.8D ED AF | $899.95 | 77mm | 9.42 | 5 | Ken Rockwell Ken Rockwell (afs) SLR Gear Nikon Imaging Bjørn Rørslett Rating Nikon USA |
Budget of $1000 or More
| Description | 2007 Cost | Filter | Film | Manual | IQ | BR | Reviews |
|---|---|---|---|---|---|---|---|
| Nikon 17mm-55mm f/2.8G ED-IF AF-S DX Nikkor | $1199.95 | 77mm | 9.18 | 4.5-5 | Ken Rockwell SLR Gear Bjørn Rørslett Rating Nikon USA PhotoZone |
||
| Nikon 17mm-35mm f/2.8G ED-IF AF-S Nikkor | $1499.95 | 77mm | 9.11 | 5 | Ken Rockwell SLR Gear Bjørn Rørslett Rating Bjørn Rørslett Review Nikon USA |
||
| Nikon 80mm - 400mm f/4.5-5.6D ED AF VR | $1429.95 | 77mm | 8.77 | 4 | Ken Rockwell SLR Gear Bjørn Rørslett Rating Bjørn Rørslett Review Nikon USA PhotoZone |
||
| Nikon 28mm - 70mm f/2.8 ED-IF AF-S | $1434.95 | 77mm | 9.6 | 5 | Ken Rockwell SLR Gear Bjørn Rørslett Rating Nikon USA PhotoZone |
||
| Nikon 70-200mm f/2.8G AF-S VR | $1624.95 | 77mm | 9.83 | 5 | Ken Rockwell SLR Gear Bjørn Rørslett Rating Nikon USA PhotoZone |
Other Popular Lenses
These lenses are good values, but in my opinion, not the best. I've listed them because they get recommended frequently. In the cases of the f/1.4 lenses, the similar f/1.8 lenses are better values in my opinion.
The Nikon 105mm f/2.8G ED-IF AF-S VR while recommended by some, it's not recommended by others and the older non VR version appears to be a better value. Unfortunately, it's no longer available new.
| Description | 2007 Cost | Filter | Film | Manual | IQ | BR | Reviews |
|---|---|---|---|---|---|---|---|
| Nikon 70mm-300mm f.4-5.6G | $134.95 | 62mm | 7.43 | 3-3.5 | Ken Rockwell SLR Gear Bjørn Rørslett Rating Nikon USA PhotoZone |
||
| Nikon 50mm f1.4D AF | $284.95 | 52mm | 8.79 | Ken Rockwell SLR Gear Nikon USA PhotoZone |
|||
| Nikon 18mm - 70mm f/3.5-4.5G ED-IF AF-S DX Nikkor | $349.95 | 67mm | 8.28 | 4 | Ken Rockwell SLR Gear Nikon USA PhotoZone |
||
| Nikon 60mm f/2.8D AF Micro-Nikkor | $349.95 | 62mm | 9.50 | SLR Gear Nikon USA PhotoZone |
|||
| Tamron 28-75mm f/2.8 XR Di LD-IF AF | $369.95 | 67mm | 8.85 | SLR Gear PhotoZone |
|||
| Sigma 10mm-20mm f/4-5.6 EX DC AF | $499.00 | 77mm | 8.48 | Ken Rockwell SLR Gear PhotoZone |
|||
| Tokina 12mm-24mm f/4.0 PRO DX AF | $499.00 | 77mm | 8.08 | Ken Rockwell SLR Gear PhotoZone |
|||
| Nikon 24 - 120mm f/3.5-5.6G ED-IF AF-S VR | $514.95 | 72mm | 8.00 | 3.5 | Ken Rockwell SLR Gear Bjørn Rørslett Rating Nikon USA PhotoZone |
||
| Nikon 105mm f/2.8G ED-IF AF-S VR | $759.95 | 62mm | 9.50 | Ken Rockwell SLR Gear Nikon USA PhotoZone |
|||
| Nikon 12mm-24mm f/4.0G ED-IF AF | $899.95 | 77mm | 8.07 | 3.5-5 | Ken Rockwell SLR Gear Bjørn Rørslett Rating Nikon USA PhotoZone |
||
| Nikon 85mm f/1.4D IF AF | $1024.95 | 77mm | 10.00 | 5 | Ken Rockwell SLR Gear Bjørn Rørslett Rating Nikon USA PhotoZone |
Notes
All lenses have some trade offs. When I see a pattern of multiple reviews reporting similar symptoms for a particular lens, I've noted it below. In many instances, some users report a lens as being not sharp, but other users report it is sharp. I would trust the measured lens results at SLR Gear and the MTF published results more than the users when it comes to sharpness.
Read the lens reviews and ratings carefully. Not all lenses that are f/2.8 provide the best image quality at f/2.8.
The Nikon 18-135mm lens has had reports of motor noise and repairs needed under warranty. I own this lens and I have personally experienced the noise problem with this lens when the lens was turned at a 90 degree angle, but it went away when turned back to the horizontal. I have not sent this lens in under any warranty repair. I am extremely happy with this lens and it's range and results.
The Nikon 105 mm VR is not recommended by Ken Rockewell due to focusing problems.
Many users of the Nikon 18-200mm have reported having the lens barrel slips when pointed down.
References
- [1] SLR Gear Nikon Zooms SLRgear.com
- [2] SLR Gear Nikon Primes SLRGear.com
- [3] What is your favorite lens? Flickr.com
- [4] What lens do you use most in photography? Flickr.com
- [5] Best of the Best Bjørn Rørslett
- [6] Nikon Lens Links
Updates
- Nov 1, 2007 - Added Sigma 10-20, Tokina 12-24 and Nikon 12-24.
Related Items
Nikon D80
In early 2007, I decided to get a digital SLR. This is a summary of the research and reasoning that led me to purchase the Nikon D80 and the Nikon 18-135mm lens and various accessories as well as my feedback and review of the products.
Why Nikon?
I was looking for a medium level SLR. I narrowed my selection to the two top SLR Manufacturers, Canon and Nikon. Out of the offerings from those manufactures, I considered the following SLR's.
| Camera | Resolution | Sep 2007 Prices |
|---|---|---|
| Nikon D40 Digital SLR | 6.1 mp | $499.95 w/ 18-55mm lens now $479.95 |
| Canon EOS Digital Rebel XT | 8.0 mp | $449.95 now $409.95 |
| Canon Digital Rebel XTi SLR | 10.1 mp | $595.95 now $517.00 |
| Nikon D40x Digital SLR | 10.2 mp | $635.99 refurbished at $449.95 |
| Nikon D80 Digital SLR | 10.2 mp | $874.95 now $729.95 |
| Canon EOS 30D Digital SLR | 8.2 mp | $999.95 now $799.95 |
| Canon EOS 40D Digital SLR | 10.1 mp | $1299.95 pre-order now $939.95 |
| Nikon D200 Digital SLR | 10.2 mp | $1499.95 now $1259.95 |
| Nikon D300 Digital SLR | 12.3 mp | $1799.95 now $1799.95 |
The jump from 6 mega pixels to 10 mega pixels was $135. The jump from 8 mega pixels to 10 mega pixels was $145. The difference was justified to me at this point so I knew I wanted a minimum 10 mega pixel camera. For my considerations this eliminated the D40 and the Rebel XT.
After handling the Canon Digital Rebel XTi, it just didn't feel right to me. I already owned the Canon Rebel Ti, and I got it because it was lighter than the Nikon N55, but it's always felt awkward in my hands but my wife loved it because of it's lighter weight and smaller size. The popular reviews made it a tough choice to eliminate, but I removed the Canon XTi from my list of choices because it just didn't feel right in my hands.
This left the selection of currently available equipment to the Nikon D40x, D80, D200 and the non EOS 30D. I had both some Canon 35mm film equipment and access to quite a bit older Nikon 35mm film equipment (circa 1972). I decided to eliminate the Canon 30D and narrow the selection to the three Nikons.
Nikon D40x, D80, D200 Comparison
Most of the features are very similar between the Nikon D40x, D80, and D200. The price difference of $600 to $1500 is a pretty big spread. What made the features so much better on the D80 and D200 to justify the cost? I had to gleam most of this information from the Nikon specifications, but the article Nikon D80 vs D200 was also helpful. I included an importance factor to evaluate these. There are some features that I have weighted more heavily after use than when I initially evaluated them. These turned out to be more important than I thought.
| Feature | Importance | D40x | D80 | D200 |
|---|---|---|---|---|
| Viewfinder | 1 | .8x | .95x | .94x |
| Aperture Dial | 1 | No* | Yes | Yes |
| Shutter Dial | 1 | Yes | Yes | Yes |
| ISO Button | 1 | No* | Yes | Yes |
| White Balance Button | 1 | No* | Yes | Yes |
| Weight | 1 | 495g 1lb 1oz |
585g 1lb 5oz |
830g 1lb 13oz |
| Wired remote | 2 | None | MC-DC1 | MC-30 or MC-36 |
| Frame Rate | 3 | 2.5 / sec | 3 / sec | 5 / sec |
| Weather sealed | 3 | No | No | Yes |
| ISO in finder | 3 | No | No* | Yes |
| Pre-AI Lens | 3 | Yes | No | No |
| AI Metering | 3 | No | No | Yes |
| AF Lens (Body driven) | 4 | No | Yes | Yes |
| Auto Focus Points | 4 | 3 | 11 | 11 |
| Metering Sensor | 4 | 420 segment | 420 segment | 1,005 segment |
| Lens mount | 4 | plastic | metal | metal |
| Bracketing | 5 | None | 2-3 steps | 2-9 steps |
| Width | 5 | 5.0" | 5.2" | 5.8" |
| Height | 5 | 3.7" | 4.1" | 4.4" |
| Depth | 5 | 3" | 3.0" | 2.9" |
| Wireless remote | 5 | ML-L3 | ML-L3 | ML-3 or WT-3 |
| Qual Button | 5 | No* | Yes | Yes |
| Memory Card Type | 5 | SD | SD | CF |
| Battery | 5 | EN-EL9 | EN-EL3e | EN-EL3e |
| Timelapse | 5 | No | No | Yes |
| ISO | 5 | 100 - 3200 | 100 - 3200 | 100 - 3200 |
| Intervalometer | 5 | No | No | Yes |
| Shutter Exp Delay | 5 | ? | Yes 400ms | Yes |
The D40 has a minimum ISO of 200 and shoots 2.5 frames / sec. All other specifications on the D40 are similar to the D40x.
The viewfinder was noticeably different between the D40x and D80 and I'm much more in favor of the D80/D200 size and view.
The lack of two dials to control both the aperture and the shutter speed were very important for me. With the Canon Rebel Ti, which has one dial, this made manual mode very annoying. I was used to using a Nikon F with full manual mode and this turned out to be the single most important factor for me in evaluating the three camera bodies. I found that having to use the menus to set the Aperture / Shutter speed / ISO was very distracting for me. I much preferred the ability to controls these directly on the D80 and D200.
The weight doesn't look that different on paper but in actual use my perception was very different. For my personal preference, the D40x is light, the D80 moderate, but the D200 is moderately heavy. There have been some discussions on this fact so don't disregard it lightly. The feedback is it's either sturdy or heavy depending on your point of view. The only way to tell is to hold it with a lens attached.
Having the ability to set the ISO and White Balance with a button and dial instead of using the menus as on the D40/D40x is a convenience. I found I did not like ISO Auto and instead preferred more manual control. Therefore the ability to set the ISO became something that was more important to me over time.
The D40/D40x does not show having a wired remote ability. If you want to take exposures longer than the 30 seconds on Bulb, you'll be limited to holding the button on the camera down and if you're like me, you'll shake the camera.
For the frame rate, 2.5 or 3 frames per second sounds like a lot on paper. After shooting a few soccer games, my feeling is it's slow. Not so slow as to be aggravating, but it's come up about once per game that I'd like faster frames / second. Not enough that I'd be willing to pay the price increase for a D200 or D300.
The D80 does have the ability to show the ISO in the view finder, but the FUNC button has to be configured to show this. Again, this isn't something I thought was important, but in using Auto ISO, or changing the ISO manually it does become more important.
Supporting a Pre-AI lens was important to me since I had access to my Father's circa 1974 set of Nikon lenses. It turns out these are pre-AI lenses and although they were Nikon F mount, the aperture ring conflicts with a minimum aperture sensor on both the D80 and D200 bodies. The Pre-AI lenses could be modified to fit the AI required mount for the D80 and D200.
Reading all the reviews on the D40x, D80, and D200 led me to believe there was not any significant difference in image performance between these bodies.
I could spend $250 more than the D40x and get the D80 which gave me the important two command dials and external buttons, and the wired remote feature. Below is a picture of the front and back dials on the D80 that show the features (1 dial, 4 buttons) that are present on the D80 that are not on the D40x.
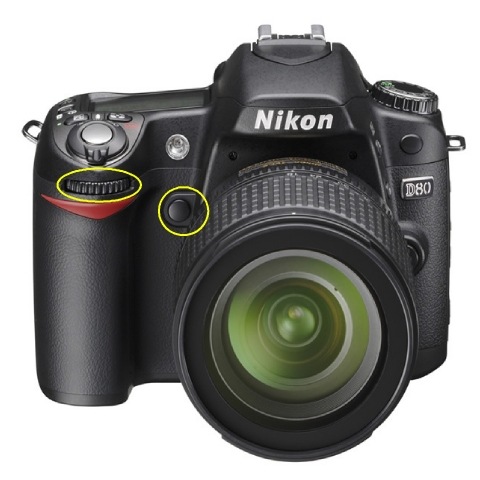
Nikon D80 Front
The front of the D80 has one button and one dial that are not present on the D40x. The D80 button can be configured to be used for several different features. I have mine configured to display the ISO setting in the viewfinder.
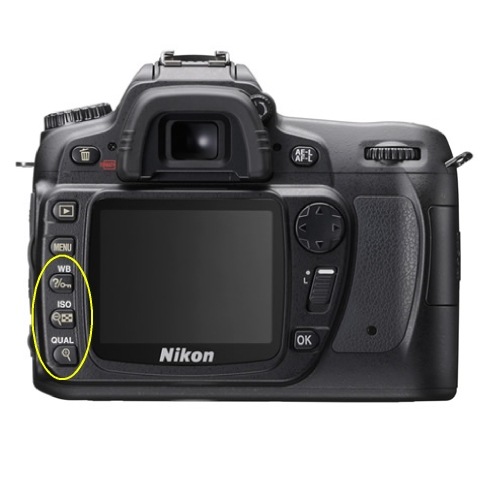
Nikon D80 Back
The back of the D80 has three buttons that are not present on the D40x. These are for White balance, ISO, and Quality settings. When presed in combination with the command dial in the upper right, these allow direct setting of these values without having to use the full screen LCD menu.
I could spend $850 more than the D40x or $600 than the D80 and get the D200 which gave me better metering, a faster frame rate, and the ability to meter on AI manual lenses.
In the end, I purchased the Nikon D80 as the most appropriate feature for cost value for my situation and I've never regretted it.
Equipment Bought
This is equipment I've actually bought and used. It's not just a wish list. I am happy with all of this equipment.
| Description | 2007 Cost | Reviews |
|---|---|---|
| Nikon D80 Digital SLR | $874.95 | Ken Rockwell DP Review Thom Hogan Nikonians |
| Nikon 18mm - 135mm f/3.5-5.6G ED-IF AF-S DX | $299.95 | Ken Rockwell SLRgear.com Thom Hogan |
| Nikon MC-DC1 Remote Release Cord for D80 | $24.95 | |
| Nikon ML-L3 IR Remote Control Transmitter for D-80 | $16.95 | |
| Lowepro Topload Zoom Mini, Holster Style Camera Case, Red. | $19.95 | |
| Nikon BM-7 LCD Monitor Cover D80 | $9.95 | |
| SanDisk 2 GB, Ultra II Secure Digital (SD) Memory Card | $34.95 | |
| Giottos Rocket Air Blaster | $9.95 | |
| Op/Tech 18" Rainsleeve | $5.99 |
I had a 28-90mm zoom and a 43-86mm Nikkor zoom. I knew I wanted a zoom lens and not a fixed focus length lens.
What I really wanted was the 18-200mm Nikon zoom. For most of 2007 this lens has been on back order and I couldn't see waiting three months to get a lens that has problems with the zoom barrel slipping. I had this problem on the 43-86mm and while for some it may be just a nuisance, I can't see spending that kind of money with something that has that kind of a problem.
I went with the Nikon 18-135mm zoom lens. The Nikon 18-135 is a great lens for me. There are reports that this lens has some quality problems and I have found on two occasions when shooting with the camera rotated 90 degrees, that the motor made an unusual grating sound. I repositioned the camera back to horizontal and the problem went away. Others have reported this problem as well. I don't know if this is going to be a problem in the future or not.
Other than this one problem, I love this lens. In discussion, a lot of professional photographers mock this lens since it's not "professional" quality. The lens takes better pictures than I have skill for at this point in time so I really have no complaints. I've read the MTF and spec charts on the lens compared to "professional" lenses and I've come to the conclusion that it's just as good a lens, but has only one drawback when compared to those lenses, it has a plastic mount. It has a manual focus ring which can be overridden without flipping a switch. I do find myself with a lot of shots taken at 135mm so that's got me wanting a little more focal length. 135mm is fine for about 50 yards or less on the soccer field, but beyond that shots require cropping.
The MC-DC1 is a must buy. I've used it several times for lunar eclipses and some slower landscape shots with the shutter delay on. I I should have bought this when I bought the camera.
The BM-7 LCD cover is my second one. I have no idea where I lost the original, but I'm glad their not expensive.
The Lowepro Topload Zoom Mini case holds the Nikon and the 18-135 but just barely so. I had this case previously with a Canon so I just continued to use it with the Nikon. If I get another, it's going to be something with a little more room at the end of the zoom.
Equipment To Buy
| Description | 2007 Cost | Reviews | My Notes |
|---|---|---|---|
| Nikon 50mm f/1.8D AF Standard Auto Focus Nikkor Lens | $109.95 | Ken Rockwell SLR Gear |
52mm filter |
| Nikon 70-300mm f/4.5 - 5.6G ED-IF AF-S VR | $479.00 | Ken Rockwell SLR Gear Nikon Imaging |
62mm filter |
| Lowepro Rezo TLZ-20 Holster-style Bag | $34.95 |
The selection of these two lenses is based off feedback from discussions and users in other groups. Everyone seems very happy with the 70-300mm VR and the only complaint is that it's not 2.8. For $400 compared to the 80-200mm f2.8 or $1200 compared to the 70-200mm f2.8 VR, I'll stick with this one. In addition, it's a perfect match to the 62mm filter size to correspond with the 18-135mm lens.
The 50mm f1.8 has gotten rave reviews and I want to try the fixed lens and it's not a big cost. I had the 50mm f1.4 Nikkor-S and the faster lens does make a significant difference in some circumstances.
Other Popular Equipment
| Description | 2007 Cost | Reviews | My Notes |
|---|---|---|---|
| Nikon 55mm - 200mm f/4-5.6G ED-IF AF-S DX VR | $229.95 | Ken Rockwell SLR Gear |
MF Ring hard to use, outside. DX Only |
| Nikon 18mm - 200mm f/3.5-5.6G ED IF AF-S DX VR | $769.95 | Ken Rockwell SLR Gear Thom Hogan |
Zoom slips Very very popular. |
| Nikon 80-200mm f/2.8D ED AF | $884.95 | Ken Rockwell Ken Rockwell (afs) SLR Gear Nikon Imaging |
Heavy Very popular. |
| Nikon 70-200mm f/2.8G AF-S VR | $1624.95 | Ken Rockwell SLR Gear |
Expensive. Very popular. |
| Nikon 105mm f/2.8G ED-IF AF-S VR Micro-Nikkor | $759.95 | SLR Gear | |
| Nikon 85mm f/1.8D AF | $399.95 | Ken Rockwell SLR Gear |
62 mm filter F stop range 1.8-16 |
| Nikon 85mm f/1.4D IF AF | $1024.95 | Ken Rockwell SLR Gear |
|
| Nikon 50mm f1.4D AF | $284.95 | Ken Rockwell SLR Gear |
F stop range 1.4 - 16 52mm filter |
After reading about all the plethora of lenses available both older F mounts with AF and the newer lenses, this is the list that I've put together. When folks are asked what equipment they have and they recommend, these lenses keep popping up in the lists. I looked at these, and most of them are a bit more expensive than I'm willing to invest in what is mostly a hobby or would duplicate what I already own. If I made income doing photography, the price of these would be easier to justify.
The one exception in cost is the Nikon 55-200 mm. This is a very compelling lens in quality and range. It fills the gap beyond the 135mm lens I have without having to spend a lot of money. All the tech specs look good for the cost. When I tried it out, it just didn't seem to feel right for me. I don't have a good way to explain it, I much preferred the 70-300mm VR with the manual focus ring and the feel for the lens and that's why it's on the list to buy instead of this one. There is not really enough difference in 200mm versus 300mm to really worry about, but the 70-300mm VR is just more appealing to me.
I've listed these here for my benefit. People seem fond of the lenses in this list and I like to refer back to them from time to time. Who know,s maybe I'll hit the lottery and the $1600 for the 70-200 VR will seem worth it to me at some point.
References
- Nikon D40x Nikon.com
- Nikon D80 Nikon.com
- Nikon D200 Nikon.com
- Nikon D80 vs D200 Ken Rockwell
- D40 Specifications Ken Rockwell
- D80 Specifications Ken Rockwell
- D200 Specifications Ken Rockwell
- AI Conversions John White
Updates
- Nov 12, 2007 - Added intervalometer and shutter delay options.
- May 30, 2008 - Updated prices on equipment.
As of May 2008, it's been over a year since I bought the Nikon. I've purchased the 50mm f1.4 and I really love the camera and the lens. There are some circumstances where the 18-135mm lens just doesn't grab enough light (indoor band concerts and indoor basketball courts) but the 50mm f1.4 really helps. The 135mm lens does not have quite enough reach beyond 50 yards on a football or soccer field. 200mm or 300mm is much better. I've tried the non VR 70-300mm lens and I'd definitely recommend the VR. It's kind of difficult for me to get a sharp focus at 300mm even in a bright sunny day on a soccer field without VR. The 18mm lens also gives a good wide angle when needed. I still find a lot of my shots are beyond 100mm.
There are several folks who have had problems with the 18-135mm lens from what appear to be a loose connection. I've experienced problems on three occasions with a strange noise trying to focus when the camera is turned on it's side. Straightening the camera out made the noise quit.
I've also found I can use some of the old equipment with a few tricks. A 50mm macro lens can be fit to the D80 with adapter rings, and a Vivitar 283 can be made to fire from the onboard flash.
Related Items
How Do Google Gadgets Work
iGoogle allows you to customize your Google home page by adding gadgets which take content from other sites. These can be categorized with tabs and you can even customize your own web pages by adding gadgets developed by others.
I was curious how this worked and how to take advantage of it and this is a summary of what I found.
The following gadget is a photo of the minute gadget using Flickr photos.
- Webmasters can get code to place on their web pages from Google Webmasters
- Users can find gadgets to place on their iGoogle home page at iGoogle Gadgets
The following is the script code that was provided from Google Webmasters.
<script type="text/javascript" src="http://gmodules.com/ig/ifr?url=http://flickr-photo-of-the-minute.googlecode.com/svn/trunk/flickr.xml&up_refresh=5&up_displayDetails=1&synd=open&w=320&h=320&title=Photo+of+the+minute&border=%23ffffff%7C3px%2C1px+solid+%23999999&output=js"></script>
The source of the gadget is located at: http://flickr-photo-of-the-minute.googlecode.com/svn/trunk/flickr.xml
From what I can tell, this is what the Google gadget appears to do.
- It runs a script at Goggle gmodules using the URL: http://gmodules.com/ig/ifr
- That URL loads another script from http://gmodules.com/ig/f/U1pEe_3SJYU/ig.js
- The Google script builds an IFRAME for the output content for the gadget.
- The content of the CDATA section is placed in an the IFRAME
If you notice the code in the script, you see a section on that embeds Google Analytics information. This isn't really a security risk, but you are being tracked as a user of the Gadget.
Content Combination Techniques
Showing a web page with content from multiple locations is what 99% of what the Internet and intra-net is about. There are a handful of techniques, but multiple technologies that support the different techniques.
Frames: The Goggle gadget (and others similar to this) use a frame. A frame basically takes content from another web page, but allows it to be displayed as if it were part of the current page.
Pre Rendered Content: Content is combined prior to output of the page. This often involves templates some type of code logic to combine the templates and data. Data is obtained from databases, XML files, static CSV files, or other web services. IIS and Apache servers use technologies including ASP, ASP.NET, and PHP to name a few.
Post Rendered Content: Content is combined in the client browser after the initial page is loaded. This requires a browser client that supports some level of scripting and at the lowest level HTTP requests. This technique takes XML or HTML after the page loads and parses it to update or output the content to local page. XMLHTTP, AJAX, ATLAS, and JavaScript are all technologies uses to make post rendered content sites work. Netflix was one of the sites to make post rendered content a feature to imitate.
Another interesting way to combine information and to allow filtering and sorting was published at MIT called Exhibit. An interesting example is the list of San Francisco Bay Restaurants
The iframe
The Google gadget really isn't anything new for the web. It's just an iFrame which is a section of the HTML document that contains another HTML document. This is useful when trying to merge content from multiple sources into a single page.
Frames are generally considered bad by designers for web design and navigation. They cause page sections to load irregularly and in an uncontrolled order and if there are errors loading the page section, then the page looks terrible from a design perspective (the user sees 404 file not found errors).
Instead of frames, designers like to use CSS on <div></div> sections to control positioning and layout.
Gadgets Pros and Cons
- Pro: You don't have to develop the code.
- Pro: You get to leverage other peoples code (almost as good as leveraging other peoples money)
- Pro: Gadgets use client bandwidth, not server bandwidth (at least not the original hosting page server)
- Pro and Con: If the gadget changes, you don't know about it
- Con: The gadgets can and often do embed tracking information
- Con: The gadgets can contain advertisements
- Con: Google knows the page that requested it
Recommendations
- I prefer not to use JavaScript if possible. Because JavaScript is runtime checked, not compile time checked, it's impossible to remove all the errors. There are pages everywhere on the web with JavaScript errors and every programmer makes them. If I use them, I prefer debugged and tested scripts that have been tested in multiple browsers.
- I do prefer pre rendered server side solutions (my preference is ASP.Net) with compiled code (VB.Net is my preference).
- If I use post rendered techniques, I like the use of XMLHTTP with simple DIV replacement techniques.
- Leverage other peoples debugged code instead of writing new code.
- Use the technique you can most likely make work most cost effectively.
- Be aware of the fact that Google gadgets are not necessarily doing things in your web sites best interest.
References
- Flickr Services flickr.com
- Google Gadgets for Webmasters goggle.com
- iGoogle Gadgets Directory goggle.com
- W3C Frames w3.org
- Exhibit MIT
Related Items
HTML Horizontal And Vertical Bar Charts
Displaying tabular information in a graphical form is helpful for a visual representation of the data. I've summarized a few simple techniques for displaying information in an HTML page in both horizontal and vertical form.
There are a few techniques I've used to make this simple.
- A table is used for the data
- An image is used for the horizontal data
- The values shown are the width of the image (or proportional)
- An image is used for the vertical data
- The values shown are the height of the image (or proportional)
Horizontal Bar Chart Sample
120 |
|
220 |
|
267 |
|
275 |
Sample Horizontal Table Data
<div class="BarTable">
    <table>
        <caption>Pages Completed Per Month</caption>
        <tr>
            <td><div class="BarLabel"">Jan</div></td>
            <td class="BarFull">
                <img src="hk.png" height="12" alt="320" width="320" />
                <p>320</p>
            </td>
        </tr>
        <tr>
            <td><div class="BarLabel"">Feb</div></td>
            <td class="BarFull">
                <img src="hp.png" height="12" alt="420" width="420" />
                <p>420</p>
            </td>
        </tr>
        <tr>
            <td><div class="BarLabel"">Mar</div></td>
            <td class="BarFull">
                <img src="hh.png" height="12" alt="467" width="467" />
                <p>467</p>
            </td>
        </tr>
        <tr>
            <td><div class="BarLabel"">Apr</div></td>
            <td class="BarFull">
                <img src="hx.png" height="12" alt="510" width="510" />
                <p>510</p>
            </td>
        </tr>
    </table>
</div>
Vertical Bar Chart Sample
|
320 |
220 |
267 |
310 |
Sample Vertical Table Data
<div class="BarTableVertical">
    <table>
        <caption>Pages Completed Per Month</caption>
        <tr class="BarVertical">
            <td><img src="vh.png" height="120" alt="320" width="12" /></td>
            <td><img src="vk.png" height="220" alt="420" width="12" /></td>
            <td><img src="vp.png" height="267" alt="467" width="12" /></td>
            <td><img src="vu.png" height="310" alt="510" width="12" /></td>
        </tr>
        <tr>
            <td><p>320</p></td>
            <td><p>420</p></td>
            <td><p>467</p></td>
            <td><p>510</p></td>
        </tr>
        <tr>
            <td><div class="BarLabel"">Jan</div></td>
            <td><div class="BarLabel"">Feb</div></td>
            <td><div class="BarLabel"">Mar</div></td>
            <td><div class="BarLabel"">Apr</div></td>
        </tr>
    </table>
</div>
CSS Styles
.Caption
{
    font-size: .9em;
    font-style: italic;
    margin: 0;
    padding: 4px;
}
.BarTable
{
    border: solid 1px #000000;
    padding: 0px;
    margin: 0px 4em 0px 4em;
    width: 80%;
}
.BarTableVertical
{
    border: solid 1px #000000;
    padding: 0px;
    margin: 0px 4em 0px 4em;
}
.BarTable tr, .BarTableVertical tr
{
    vertical-align: top;
    padding: 0px;
    margin: 0px;
    background-color: #00CC66;
}
.BarTableVertical tr td
{
    background-color: #CCFFFF;
}
.BarTable tr p, .BarTableVertical tr p
{
    position: relative;
    display: inline;
    font-size: .8em;
    padding: 0px;
    margin: 0px;
    z-index: +1;
}

.BarFull
{
    background-image: url(gridline58.gif);
    background-repeat: repeat-x;
    background-position: left top;
    width: 100%;
    background-color: #CCFFFF;
}
.BarFull p
{
    margin: 0px 4px 4px 4px;
    background-color: #FFFF99;
    color: #000000;
}
.BarVertical
{
    height: 100%;
    background-color: #CCFFFF;
}
tr.BarVertical
{
    vertical-align: bottom;
    text-align: center;
}
.BarVertical p
{
    margin: 0px 4px 4px 4px;
    background-color: #FFFF99;
    color: #000000;
    text-align: center;
}
.BarLabel
{
    padding: 0px 4px 0px 4px;
    width: 2.5em;
    font-size: .9em;
}
References
- HTML Bar Charts siteexperts.com
- HTML Horizontal Bar Chart Codeproject.com
- HTML Horizontal Bar Chart eggheadcafe.com
- Digits to Charts Codeproject.com
- XML Bar Chart aspwebsolution.com
- An accessible bar chart standards-schmandards.com
- CSS For Bar Graphs ApplesToOranges.com
- Bar Graph Eric Meyer meyerweb.com
- Vertical Bar Graphs Terrill.ca
- 10 Free CSS Graph Resources DHTMLsite.com
Related Items
How To Install a Web Application for a Site with a Specific Port
MSI installation projects created in Visual Studio 2003 allowed the setting of a PORT value. This port value would be used to search the IIS sites and install the web application by default on the first site that corresponded to the specific port.
Users migrating from Visual Studio 2003 to Visual Studio 2005 have found that support for the PORT property has been removed and there are few technical options available to solve this problem.
This article outlines how using Visual Studio 2005 SP1 and a command line and MSI custom actions to install a web application on a site configured for a specific port.
After an update to VS 2008, I see no options that resolves this in VS 2008 either.
Visual Studio 2003 Background
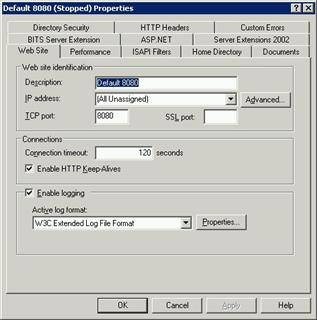
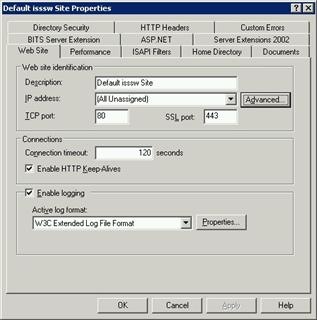
In IIS, on Windows Server 2003, multiple sites with multiple ports are used in most deployments. For example, if two sites are configured, one with port 80, the other with port 8080, they would appear as follows in the IIS administration tool.
In IIS admin, the port value and the host header value can also be set under the advanced settings.
If one wanted an MSI package to install a Web Application by default on the site that used port 8080, and the virtual directory to "TestWeb", Visual Studio 2003 made this easy.
- Select the File System view of the Web Setup project for the web application
- Select the properties view of the Web Application Folder
- Set the Port property to 8080
- Set the VirtualDirectory Property to "TestWeb"
If one wanted to pass this as a command line parameters the MSI these MSI properties could also be set.
TARGETPORT=8080
TARGETVDIR=TestWeb
TARGETDIR="C:\Program Files\..."
The property TARGETDIR can also be used to specify the physical path where the application should be installed.
Command Line Options for TARGETSITE
Msiexec /I "Websetup1.msi" TARGETSITE="/LM/W3SVC/1"
The problem with this approach is that the site will not be the same number on every server. We can use this approach to know what site number is used based on the port number assigned to that site. We can use the algorithm noted below in a VB script to find the server number and use the update the TARGETSITE on the command line.
- serverNumber = FindServerNumber( 9115)
- tgtSite = "/LM/W3SVC/" & serverNumber
- shell.Run "msiexec /passive /I """ & argInstallerName & """ TARGETSITE=" & tgtSite
Function FindServerNum(strPort)
    Dim MD_SERVER_STATE_STARTED, MachineName, IISObjectPath, IISObjects
    Dim ChildObject, ChildObjectName
    'Dim Servers
    Dim ServerNum, i, strBindings, strSvrPort, BindArray, binding
    Dim svrCount, arrCount, Servers(10), site
    svrCount = 0
    arrCount = 0
    i = 0
    MD_SERVER_STATE_STARTED = 2
    MachineName = "localhost"
    IISObjectPath = "IIS://" & MachineName & "/W3SVC"

    Set IISObject = GetObject(IISObjectPath)
    'Find all the server numbers pu into an array
    for each ChildObject in IISObject
        ChildObjectName = ChildObject.AdsPath
        ChildObjectName = Right(ChildObjectName, Len(ChildObjectName)- InStrRev(ChildObjectName, "/"))
    on error resume next
        ServerNum = Clng(ChildObjectName)
        If (Err = 0) Then
            Servers(arrCount) = ServerNum
            arrCount = arrCount + 1
        End If
    next

    'Get the port number and compare with the passed port number. If match, return the server number
    while i <= arrCount
        set site = IISObject.GetObject("IIsWebServer", Servers(i))
        ' Gets the Port Number of the current IISObject.
        BindArray = site.ServerBindings
    on error resume next
        strBindings = BindArray(0)
        If Err = 0 Then
            'remove the : char from begining and end of the port number
            strSvrPort = Left(strBindings, InStrRev(strBindings, ":") - 1)
            strSvrPort = Right(strSvrPort, Len(strSvrPort) - InStr(strSvrPort, ":"))
    on error resume next
            If cint(strPort) = cint(strSvrPort) Then
                If Err = 0 Then
                    If IISObject.ServerState = MD_SERVER_STATE_STARTED Then
                    ' Determines if this is our server. IIS can only have one
                    ' active port, so if the port is active it is the port where
                    ' the application is installed.
                    FindServerNum = Servers(i)
                    svrCount = svrCount + 1
                    exit function
                End If
            End If
        End If
        i = i + 1
    wend

    If svrCount = 0 Then
    ' Err.Raise 9999, "FindServerNum", "No Active Servers with the requested port were found. Port=" & strPort &  ". "
    End If

End Function
A copy of the script can be downloaded MSIInstallScript.zip.
Getting the TARGETSITE in a Custom Action
If you follow the basic line of logic from the article at Walkthrough: Passing Data to a Custom Action then getting the TARGESITE value is fairly simple.
- Create an Installer Class (Add new item, Installer class)
- Put the code in the installer class to process the parameters
Public Overrides Sub Install(ByVal stateSaver As System.Collections.IDictionary) ' Gets the parameter passed across in the CustomActionData. MyBase.Install(stateSaver) Dim strSite As String = Nothing strSite = Me.Context.Parameters.Item("SITE").ToString MsgBox("SITE=" & strSite, MsgBoxStyle.Information, "Custom Install") Me.Context.LogMessage("JS Action Before SITE=" & strSite) End Sub - Add the output from the installer class to the web installation (View File System, Add project output, select primary output from the project with the installer class)
- Create the custom action (View custom actions, add custom action, select Web Application Folder, select Primary output from the project with the installer class)
- 5. Set the CustomActionData property for the custom action as follows:
/SITE=[TARGETSITE] /PORT=[TARGETPORT] /VDIR=[TARGETVDIR] /TDIR="[TARGETDIR]\"
If you run the following command, you should see a message box that appears showing the SITE value.
msiexec.exe /qf /norestart /Liwearucmopvx! MSIInstall.log /i WebSetupald.msi
Setting the TARGETSITE in the Custom Action
So now we have read it, we should be able to set it.
Me.Context.Parameters.Item("SITE") = "/LM/W3SVC/1"
Actually, this is misleading, you can’t set the TARGETSITE. Ok, you can, but by the time you set it, the TARGETSITE has already been established and so setting it is a moot point.
If you actually run this, you will see there are two problems with this approach. First, the component that executes the custom action actually gets installed in the TARGETSITE and TARGETVDIR. Second, since the TARGETSITE has already been set in the User Dialog or Acquisition or User Dialog phase of gathering the data to set the properties for the installation.
The Windows Installer goes through a series of sequences for the MSI package: Initialization; User Dialog; Finalization or Rollback. A full explanation of these phases is best explain in the article Installation Phases and In-Script Execution Options for Custom Actions in Windows Installer.
Essentially, this is a chicken and egg problem. One can’t set the property in the custom action because by the time the custom action is invoked, the property for TARGETSITE is already set.
Phil Wilson also explains the same sequencing problem in his article Visual Studio Setup - projects and custom actions.
Conclusion
Essentially if you have to solve the problem of installing an application on a site with a specific port, there are two options. Set the TARGETSITE property and pass this as a parameter prior to invoking msi install, or moving to another tool like Windows Installation Studio 7 by Wise (aka Altiris) or InstallShield from Marco Vision. These products allow the creation of dialog windows which can be customized with further custom actions and logic far beyond what the Visual Studio 2003 or 2005 products allow.
References
- [1] Modifying Internet Information Services During Deployment with Custom Actions
- [2] How to Pass Command Line Arguments to MSI Installer Custom Actions
- [3] Walkthrough: Passing Data to a Custom Action
- [4] Visual Studio Setup - projects and custom actions
- [5] Building Custom Installer Classes in .NET
- [6] Custom Installer Actions: Edit Connection Strings, IIS Directory Security Settings, etc.
- [7] Windows Installer XML (WIX) Toolset
- [8] How to get the installed WebSite in VS2005 WebSetup installer customAction?
- [9] How do I set property in Custom Action?
- [10] Windows Installer Custom Actions
- [11] ] Installation Phases and In-Script Execution Options for Custom Actions in Windows Installer
Related Items
2007 Keystone Colorado Trip
I recently had the opportunity to travel to Keystone, Colorado. This is a summary of the wonderful experiences I had on the trip, including a sleigh ride, snowmobiling, and dinner atop a ski lodge.
The camera and lens used in all pictures is a Nikon D80 with the Nikon 18-135 mm lens available at Adorama.
Sleigh Ride Dinner
The activity for the first evening was a horse drawn sleigh ride and dinner. This started at about 4:30 pm in a national park just outside of Keystone, Colorado. The scenery was absolutely beautiful. It was dark when we came back, but the moon was out and the stars were extremely bright. If you are visiting with friends or family, I would highly recommend a sleigh ride, but I recommend it during the daylight hours. When the sun goes down, it gets cold quickly in the Colorado mountains.
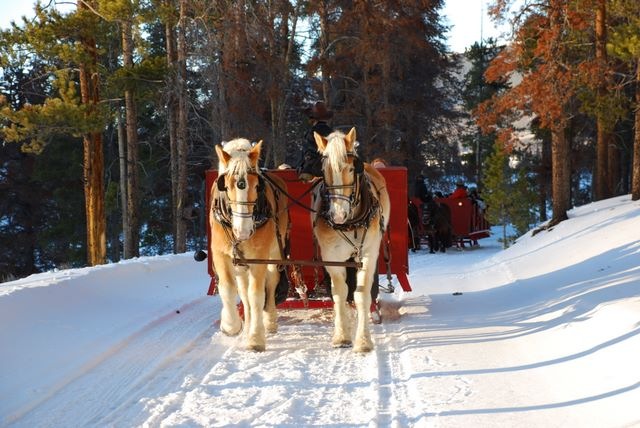
Sleigh Ride
Nikon D80 18-135 mm lens @ 70 mm F5.6 1/60 sec ISO-100.
Dinner at the ranch
Nikon D80 18-135 mm lens @ 70 mm F5.6 1/400 sec ISO-100.
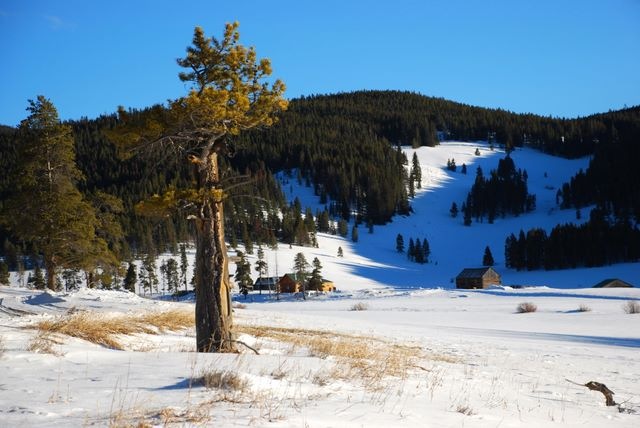
Mountain Sunrise
I stayed at the Lakeside Village at Keystone Lake. My body was still on east coast time and I woke up early the next morning so I went for a walk around the lake and I caught a glimpse of the sunrise cascading over the mountain tops.

Sunrise on the mountains
Nikon D80 18-135 mm lens @ 135 mm F5.6 1/200 sec ISO-100.

Sunrise complete
Nikon D80 18-135 mm lens @ 120 mm F5.6 1/320 sec ISO-100.
Snowmobile Trip
Later the second day I went on a Snowmobile trip. That was a lot of fun. It's like a waverunner on the snow.
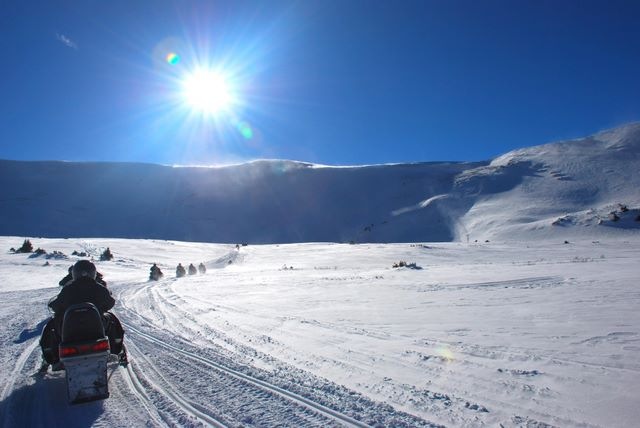
Snowmobile trip
Nikon D80 18-135 mm lens @ 20 mm F10 1/400 sec ISO-100.
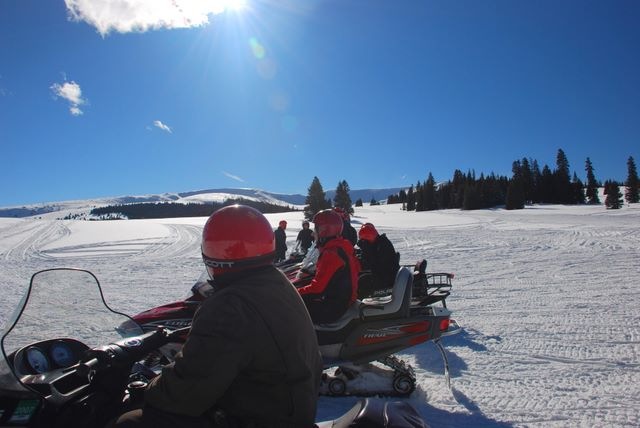
Snowmobilers in waiting
Nikon D80 18-135 mm lens @ 18 mm F8 1/250 sec ISO-100.

The view from the top
Nikon D80 18-135 mm lens @ 85 mm F6.3 1/640 sec ISO-100.
Fondue Lodge Dinner
On the evening of the second day, there was a Fondue dinner at Der Fondue Chessel. Most of the pictures inside the restaurant were quite dark so I've not posted them.
The Camera and Lens
The camera and lens used in all pictures is a Nikon D80 with the Nikon 18-135 mm lens available at Adorama.
All images and content are Copyright © 2007 Tim Stanley, All Rights Reserved.
Some of the images of the sunrise in the mountains exhibit the falloff or darkened corners that Ken Rockwell mentions in his Nikon 18-135 mm lens review. It gives either a nice effect or not depending on ones preference.