Blog
Migrating to .Net8
On November 14, 2023, Microsoft released .Net 8. After getting Visual Studio Professional 17.8 installed, updating to .Net 8 was easy.
Changing the obligatory TargetFramework entry in all the projects:
<TargetFramework>net8.0</TargetFramework>
Updating the package references from 7.0.0 to 8.0.0:
<PackageReference Include="Microsoft.Extensions.Hosting" Version="8.0.0" />
Updating the github action yml file to use the new dotnet version:
      - name: Set up .NET Core
        uses: actions/setup-dotnet@v3
        with:
          dotnet-version: '8.x'
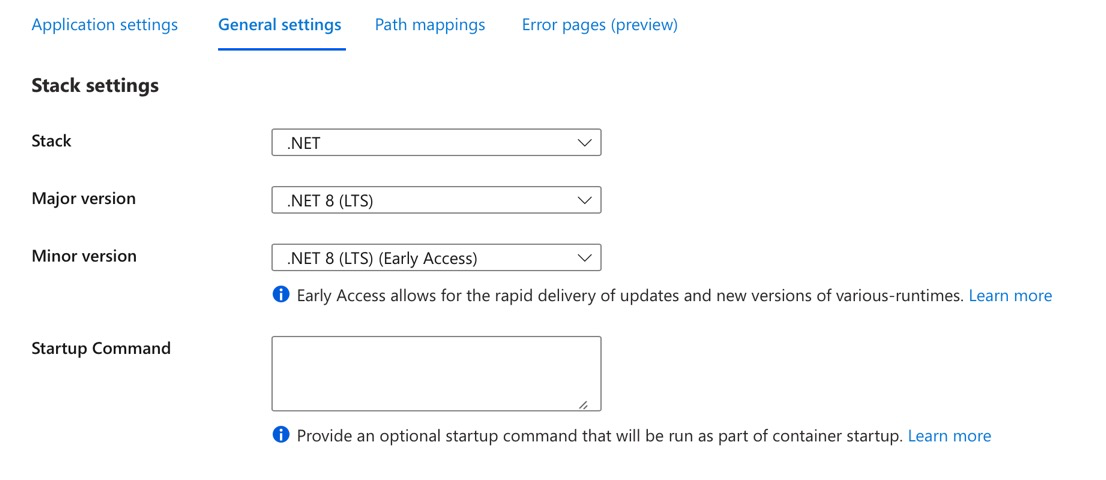
Azure even had all the website hosting ready so I didn't have to wait for anyone to deploy .Net 8.
I did need to update the App service configuration to switch from .Net 7 to .Net 8 LTS. It was a little confusing because only the .NET 8 LTS (Early Access) option was listed for .Net 8.
References
Related Items
Macbook Pro M2 Limitations for Development
I recently updated from a 2018 MacBook Pro Intel i9 to a 2023 MacBook Pro M2 Max. The primary reason; faster compilation times. So how much faster is the new MacBook Pro M2 Max than the older machine: 50-80% faster in compile times.
Most of the OSX applications worked without any issues at all, but there were some limitations of the M2 that are not widely documented. There were several Visual Studio limitations on Windows 11 ARM under parallels. This is a summary of the limitations and issues I found.
For a professional software developer, a developer machine lasts 5-7 years. Reliable laptops like the MacBook last longer for consumer use, but after 5-7 years the gains in speed for professional software development almost always justify the upgrade even if there are no issues with the hardware.
When using a large source repository with thousands of libraries that takes over an hour to build, a 50-80% improvement in build time is a significantly measurable increase in productivity.
Specifications
The new MacBook Pro M2 Max specification:
- Apple M2 Max, 12 cores
- 64 GB memory LPDDR5
- Sonoma 14.0
- 2 TB SSD
⠀ The older MacBook specification:
- Intel i9 2.9 Ghz 6-Core
- 32 GB memory DDR4
- Ventura 12.5.2
- 1 TB SSD
⠀
MacBook OSX Limitations and Issues
Overall I would rate the M2 OSX migration 5 stars out of 5.
- Fortinet VPN Client on the Mac did not migrate using a backup/restore with a TimeMachine backup. The Fortinet VPN Client was re-installed, and configuration was setup again and it worked.
- Samsung T5 and T7 SSD's were not readable on the new MacBook. I removed the Samsung lock, reformatted to APFS with encryption and the SSD's were readable.
- Adobe Global Protect 5.1.13-38 would not install. The fix is to update a newer version. Adobe documents that 5.1.13-48 not supported on Sonoma on ARM see https://docs.paloaltonetworks.com/compatibility-matrix/globalprotect/where-can-i-install-the-globalprotect-app
⠀ The VPN issues are not entirely unexpected. VPN drivers need to do some low level stuff, but the both Fortinet and Adobe seem to have updates to work through the issues.
I did have to install Rosetta 2 when prompted. That allowed running the 30 Intel apps that I had installed previously. All without issue so far.
That was it. For the Mac applications, there were no other issues. That was a pleasant surprise. I was anticipating more compatibility problems.
Applications I ran without any issues.
- Office 365 / Outlook / Word/ Excel / PowerPoint
- Evernote
- Things 3
- ScanSnap
- KeePassXC
- Disk Inventory X
- Authy
- Firefox
- Chrome
- Bear
- Visual Studio code
- .Net 6
- PowerShell core
⠀
Parallels Windows 11 ARM64 Limitations and Issues
I use Windows 11 under Parallels for software development with Visual Studio and .Net. This was a little more challenging and I ran into a few more issues.
Overall I would rate this experience 3 stars out of 5 mainly due to the undocumented lack of some Visual Studio Workload support.
First, Parallels will not run an x64 Windows virtual machine on the M2 chip. It will only run a Windows ARM configuration on the M2 chip. That means a Windows ARM configuration, not a x64 configuration. That also means installing Visual Studio ARM on top of Windows ARM.
- Windows Server 2022 VM could not be created. I had a Windows 11 and Windows Server Parallels VM previously.
- Fortinet VPN Client would not install correctly on ARM. It installed, logged an eventlog error and would not start. The alternative is to use the Host Mac VPN client instead.
- SQL Server 2022 Developer Edition would not install on ARM. This is a widely documented issue. SQL Server does run under ARM, it just doesn't install. The workaround is to use powershell install scripts on https://github.com/jimm98y/MSSQLEXPRESS-M1-Install .
- Global Protect VPN 5.1.13-48 is not supported on Windows ARM. It would install without errors, but will not connect. The resolution is to update to Global Protect 6.0 or later.
- Notepad++ on ARM does not have XML Tools plugin support.
- Visual Studio Markdown plugin will not install on Visual Studio 2022 ARM. https://marketplace.visualstudio.com/items?itemName=MadsKristensen.MarkdownEditor2 On GitHub at: https://github.com/madskristensen/MarkdownEditor2022
- Visual Studio Windows Workflow Foundation will not install on ARM.
- Visual Studio Workload for Data Storage and processing is not available to install on ARM.
- Visual Studio Workload for Data Science and analytical applications is not available to install on ARM.
- Visual Studio Workload for Office / SharePoint development is not available to install on ARM.
- Visual Studio LINQ to SQL tools is not available to install on ARM.
- Visual Studio class designer is not available to install on ARM.
⠀ That's quite a few Workloads and components for Visual Studio not supported on the ARM. I have not seen that information listed anywhere that those are not supported. If your development needs require them and you use Windows 11 on an ARM, you have been warned.
This link describes the Visual Studio workloads supported by ARM: https://github.com/MicrosoftDocs/visualstudio-docs/blob/main/docs/install/visual-studio-on-arm-devices.md
The Arm64 GA supports the following workloads:
- .NET desktop development
- Desktop development with C++
- ASP.NET and web development
- Universal Windows Platform development
- Visual Studio extension development
- Game development with C++
- Node.js development
Unfortunately Microsoft does not list the workloads that are not supported. That was a bit of a disappointment that Windows Workflow Foundation isn't supported. I work with a company that is currently using Windows Workflow Foundation so those projects will not build. I know Windows Workflow foundation did not make it's way into .Net 5 or later, but it is a bit disappointing for it not to show up on ARM.
The Data storage and processing workload (which is not available for ARM) includes Azure Development for:
- Azure Data Lake and Stream Analytics Tools
- Azure Resource Manager tools
- Azure Cloud Services tools
- Service Fabric Tools
- Azure Powershell
The following Visual Studio Cloud, database, and server components are not available to install on ARM:
- Azure Authoring Tools
- Azure Cloud Services build tools
- Azure Cloud Services core tools
- Azure Compute Emulator
- Azure Data Lake and Stream Analytics Tools
- Azure development prerequisites
- Azure libraries for .NET
- Azure Powershell
- Azure Resource Manager core tools
- CLR Data types for SQL Server
Refer to this link for more information on ARM64 Visual Studio: https://devblogs.microsoft.com/visualstudio/arm64-visual-studio/
The SQL Server install issue is a bit confusing. Microsoft documents SQL will support running on ARM64 https://learn.microsoft.com/en-us/sql/sql-server/install/hardware-and-software-requirements-for-installing-sql-server-2019?view=sql-server-ver15#pmosr. But there seems to be something in the installation process that fails on ARM64. The PowerShell scripts workaround provided an ideal solution.
This are other workarounds to the SQL Server install issue by using a docker instance, but that only uses SQL Authentication and not Active Directory domain authentication. https://database.guide/how-to-install-sql-server-on-an-m1-mac-arm64/
On a positive note, the following software ran on Windows ARM under the Parallels virtual machine without issues:
- 7zip
- Notepad++ (one XML extension issue noted above)
- .Net 7 SDK 7.0.12
- Powershell Core 7.3.8
- Git 2.41
- OpenJS.NodeJS.LTS --version 16.20.0
- Python 3.8
- MSBuildStructuredLogViewer
- WinMerge 2.16.32
- Agent Ransack
- DB Browser for SQLite
- Quicken Classic
- Visual Studio 2022
- Visual Studio Code
- SQL Server 2022 Developer Edition (see install issue above)
- Microsoft SQL Server Management Studio 19.1
Windows Developer Performance Settings
A few key tips for getting maximum performance from a virtual machine for Windows.
Disable Windows Search (Services, Windows Search, properties, Startup type: Disabled). It runs in the background draining resources for compiles.
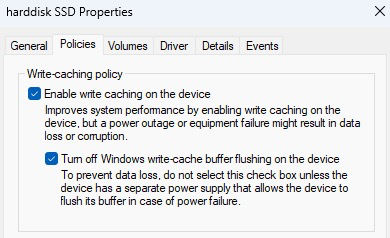
For a virtual machine, set the hard disk properties to enable write caching, and turn off windows write-cache buffer flushing.
And tell Windows Defender / Windows Security to ignore the build tools.
Set-MpPreference -ExclusionExtension @(".cs", ".csproj", ".json", ".xml") -ExclusionProcess @("dotnet.exe", "msbuild.exe", "node.exe", "devenv.exe", "git.exe")
Microsoft on Windows 11 has a new performance feature called Dev Drive which runs ReFS instead of NTFS. The theory is it's a faster file system, and can be tuned to tell Windows Defender to ignore some of the disk i/o for faster build times. I tried it under Windows 11 in Parallels, but I did not see any measurable increase in build times.
Related Items
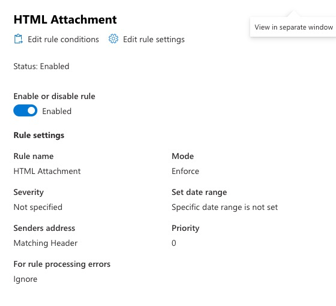
Office 365 HTML Attachment Mail Flow Rules
Office 365 will by default filter out emails that have attachments that are executables (exe, scr, ps1, cmd, etc.) as well as an unencrypted zip file that contains executables. Office 365 allows HTML files as attachments to email because these are considered to be potentially valid email from some vendors. Attackers will attach HTML files that contain malicious javascript and will try to mask the origin of the email and it's contents. If they can convince you to download the attachment and open it, this can cause you some serious problems. This article is a summary of how to create an Office 365 Exchange Mail Flow rule to add some warning to users.
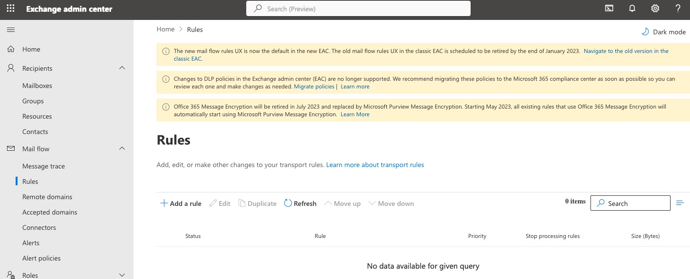
Exchange Admin Center Mail Flow Rules
https://admin.exchange.microsoft.com/#/transportrules
Navigate to the Exchange Admin Center. Select Rules, + Add a rule

The new rule should have the following key entries:
- Apply this rule if any attachment matches HTML, HTML, html or htm.
- Prepend the subject of the message with [ATTACHMENT-FAIL]
- Apply and prepend a disclaimer
- Generate and Incident report and send it to the domain administrators.
<span style="color:red"><b><p>
[ATTACHMENT-FAIL] WARNING,
This message has an HTML attachment and may be invalid or contain a virus.
USE EXTREME CAUTION in opening any attachment.
</p></b></span>
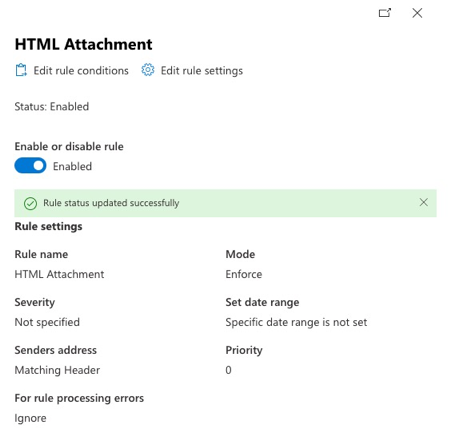
Below is an image of the rule.
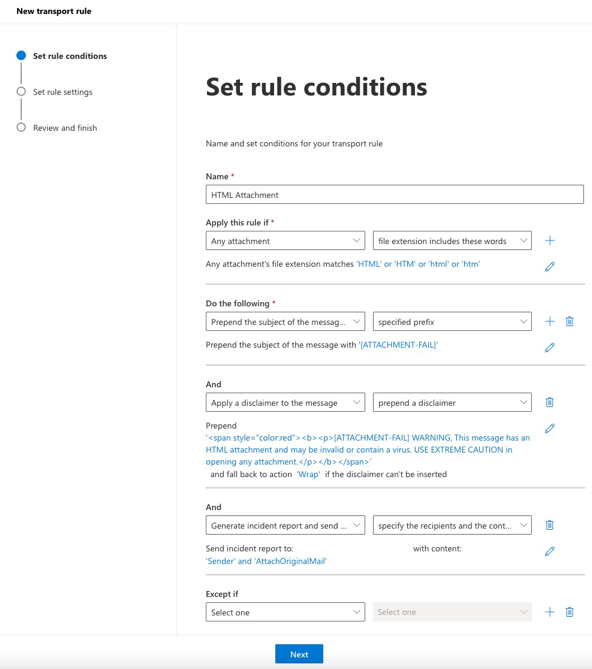
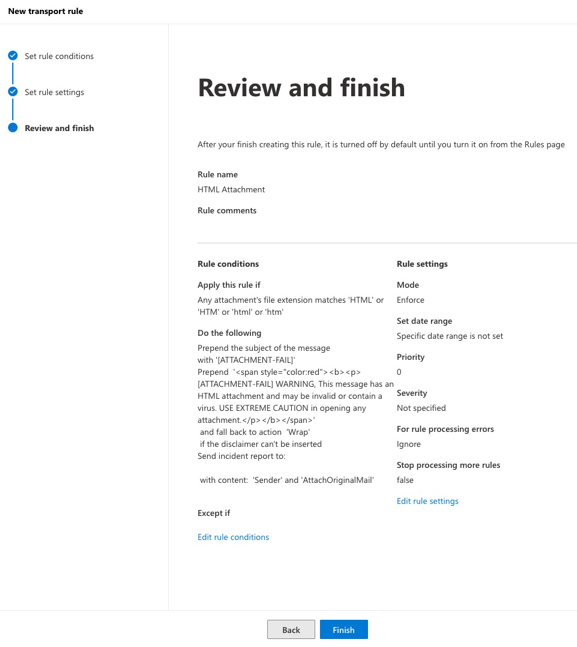
Once the rule is created, it will be disabled by default. The rule needs to be enabled to process the rules.
#evernote
Related Items
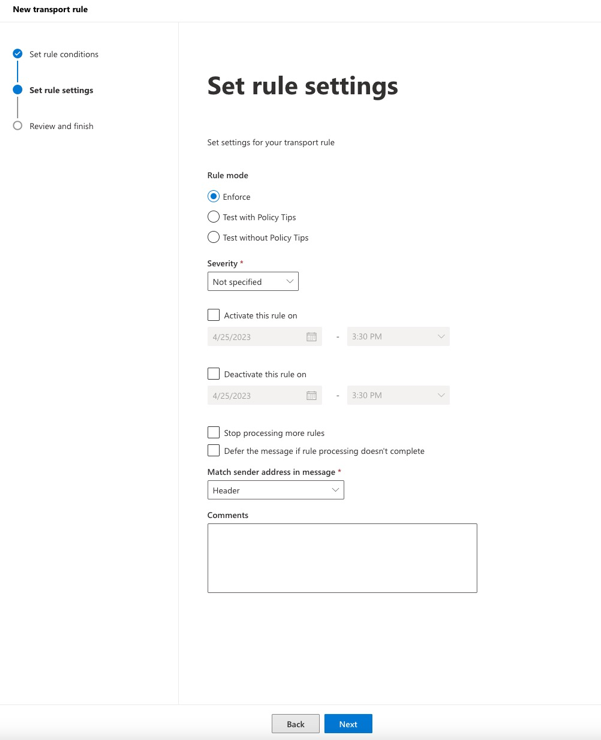
Office 365 SPF Mail Flow Rules
The Sender Policy Framework (SPF) allows one to configure DNS entries to list valid sources of truth for Office 365 email. Attackers will often try to send email from outside a domain to recipients inside the domain by pretending they are another person within the company. Creating an SPF rule that flags messages from outside the company pretending to be inside the company alerts users. This article is a summary of how to create an Office 365 Exhcange Mail Flow rule to warn users of SPF invalid messages.
Configure the SPF DNS Entry
A DNS entry is required to list the valid sources from where email can be sent. Below is an example SPF record for an Office 365 account.
v=spf1 include:spf.protection.outlook.com -all
Configure the Exchange Admin Center Mail Flow Rules
Navigate to the Exchange Admin Center. Select Rules, + Add a rule
The new rule should have the following key entries:
- Apply this rule if the message headers 'Authentication-Results' includes 'spf-permerror' or 'Received-SPF:Fail' or 'spf-fail' or 'SPF:Fail'
- The sender domain is
{your-email-domain.com} - Prepend the subject with [SPF-FAIL]
- Apply a disclaimer to the message and prepend the appropriate prepend warning text.
- Generate and incident and send it to the domain administrators.
Sample prepend warning text.
<span style="color:red"><p><b>
[SPF-FAIL] WARNING, This messages does not appear to be a valid domain.com mail message.
USE EXTREME CAUTION in opening any attachment.
</p></b></span>
Below are the images used in Office 365 to configure a new rule.
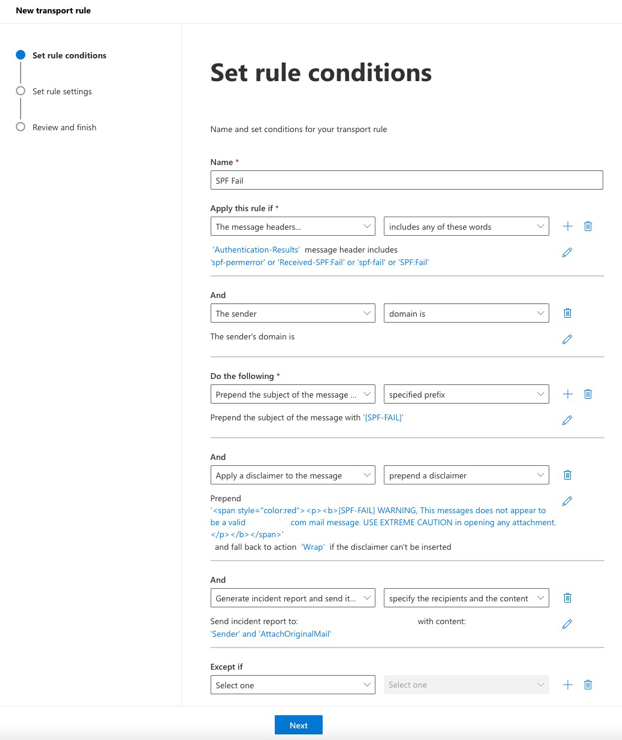
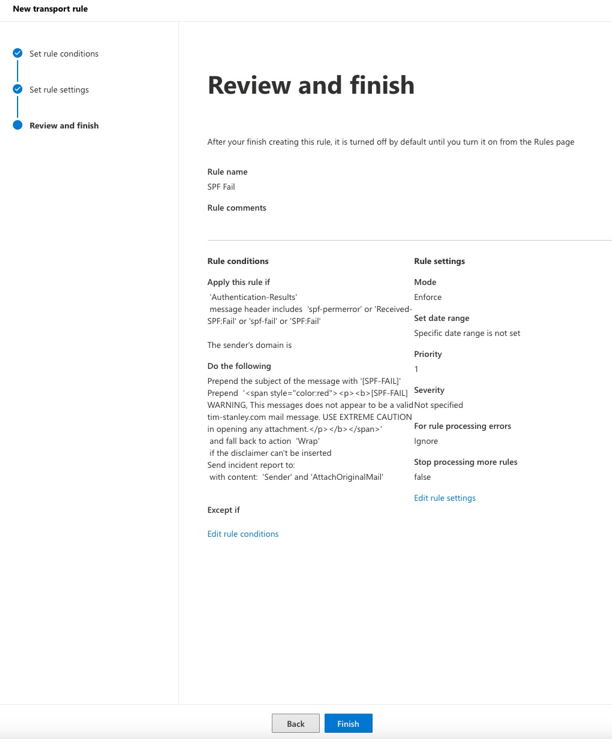
Enable the rule.
Related Items
Deriving Version Information from Git for Incremental Builds
If you want to generate a unique build number for each build in Azure Devops, Git, Team City, or other environments consistently, it can be challenging. This article is a summary of how to generate a unique build number when using git repositories, across multiple environments.
Microsoft Guidance
Microsoft has some guidance for versioning of libraries at https://learn.microsoft.com/en-ca/dotnet/standard/library-guidance/versioning#version-numbers [1].
Microsoft also has some guidance on package versioning of pre-releases at https://learn.microsoft.com/en-us/nuget/create-packages/prerelease-packages [2]
Some key points:
- CONSIDER using SemVer 2.0.0 to version your NuGet package version.
- CONSIDER only including a major version in the AssemblyVersion. aka 7.0.0.0. This helps reduce binding redirects.
- DO use an AssemblyFileVersion the format Major.Minor.Build.Revision for file version.
- Older versions of Visual Studio raise a build warning if this version doesn't follow the format Major.Minor.Build.Revision. The warning can be safely ignored.
- And implied, CONSIDER making the FileVersion and PackageVersion unique for each build.
⚠️ Warning: If you push your packages to a NuGet server, Azure Artifacts, or GitHub Artifacts, the PackageVersion must be unique on each build.
📝 Note: If a PackageVersion is not unique on each build, the nuget cache must be cleared between builds or the restore will not pick up the new package..
📝 Note: New style CSPROJ files that use the dotnet SDK (Microsoft.Net.SDK) style projects do not require the AssemblyInfo.cs file. Old style CSPROJ files that use the MSBUILD xml format, use AssembyInfo.cs to control default version information.
📝 Note: Traditional Microsoft build tooling used versioning in the format: ....
Semantic Versioning 2.0
Semantic Versioning [3] provides a versioning scheme useful for libraries and packages.
Key points semantic versioning:
- It effects a PUBLIC API, not internals, or dependencies.
{major}.{minor}.{match}-{prerelease}+{metadata}.- Major number changes for any public API breaking non backward compatible change.
- Uses the following format
<valid semver> ::= <version core>
                 | <version core> "-" <pre-release>
                 | <version core> "+" <build>
                 | <version core> "-" <pre-release> "+" <build>
Semantic Versioning Examples:
- Public Release Examples: 1.0.0, 7.0.2, 7.0.3.
- Prerelease Examples: 1.0.0-alpha, 1.0.0-alpha.1, 1.0.0-0.3.7, 1.0.0-x.7.z.92, 1.0.0-x-y-z.--.
- Metadata Examples: 1.0.0-alpha+001, 1.0.0+20130313144700, 1.0.0-beta+exp.sha.5114f85, 1.0.0+21AF26D3----117B344092BD.
- Precedence of prerelease is less than without prerelease, Example: 1.0.0-alpha < 1.0.0.
- Precedence of prerelease is alphabetic, Example: 1.0.0-alpha < 1.0.0-alpha.1 < 1.0.0-alpha.beta < 1.0.0-beta < 1.0.0-beta.2 < 1.0.0-beta.11 < 1.0.0-rc.1 < 1.0.0.
Versioning Tools
MinVersion
The MinVersion package is good if you want use semantic versioning 2.0 and want to embed the logic for the generation into MSBUILD properties for a project. The MinVersion CLI also provides a string that uses the same algorithm. Both the MinVersion package and the MinVersion CLI derive a version from a git tag in a special format (i.e. '7.0.2', 'ver-7.02')
https://www.nuget.org/packages/MinVer [4]
dotnet add package MinVer --version 4.3.0
https://www.nuget.org/packages/minver-cli [5]
dotnet tool install --global minver-cli --version 4.3.0
GitVersion
GitVersion [6] provides both a command line and MSBUILD package to set properties for a project during a build. GitVersion also has support for GitHub Actions and Azure Pipelines.
Git version provides some very powerful options for continuous builds and for builds from Visual Studio Like MinVersion, the GitVersion package is good if you want use semantic versioning 2.0 and want to embed the logic for the generation into MSBUILD properties for a project.
NerdBank.GitVersioning
Nerdbank.GitVersioning [7] adds precise, semver-compatible git commit information to every assembly, VSIX, NuGet and NPM package, and more. It implicitly supports all cloud build services and CI server software because it simply uses git itself and integrates naturally in MSBuild, gulp and other build scripts.
NBGV uses a version.json file along with settings in a Directory.Build.Props file to set versioning. This means it will work with dotnet command line calls, as well as will Visual Studio Builds (if the package is added to a project).
PowerShell Git Versioning
MinVersion and GitVersion provide some compelling and powerful options, particularly if there is a desire to use the NuGet package so that version information is consistent across Visual Studio.
I have releases that are only built using command line tools, but I want to be able to build from Linux, Mac, Windows, and in Team City, GitHub Actions, and Azure Pipelines without having to adopt a new versioning strategy or change significant build scripts.
I use one of three methods for building releases, all of which are command line related:
- A PowerShell command line that calls dotnet msbuild, invoked by Team City build agents.
- GitHub Actions.
- Azure Pipelines.
GitVersion and MinVersion provide the semantic versioning calculations to come up with an appropriate package versioning scheme. If we simply let the git tag used by those patterns be used without the calculations, then the package versioning scheme can be simplified.
I have simplified the MinVersion and GitVersion logic even further so that with a simple and appropriate tag, an appropriate RTM version, continuous release, or pre-release can be generated, all using the same construct, and all derived from the latest tag in a git repository.
To create a version, we need a few things:
- A git tag with a base version number with three digits
{major}.{minor}.{build}or{major}.{minor}.{patch}. - A count to be used for incremental build number
{revision}. - An indicator if this is a pre-release or not.
By placing a tag on a git commit that contains the first three digits of a version number, then we can then count how many git commits have been made since that version number. That git tag can also include pre-release information if needed.
Git Tags
By using a pattern prefix for a tag such as 'ver-*', then it makes it easy to search the tags in a git repository and find the latest in PowerShell. This pattern of tags for versioning is used by some other tools mentioned above.
Create a tag with a prefix matching the pattern 'ver-*'.
git tag -a ver-7.0.2 -m "set version to 7.0.2"
Find the last tag with the prefix 'ver-*' powershell
$tag = git tag --list 'ver-*' | Select-Object -Last 1
Now, find the count of how many git commits have been made since the above tag.
$hash = git show $tag --format="%H" -s | Select-Object -Last 1
$line = ("git show {0}..HEAD --format=""%H"" -s" -f $hash)
$items = Invoke-Expression $line
$count = $items.Count
📝 Note: Git push and Visual Studio git push do not normally push tags. If creating a local tag, you must use the
--tagscommand to push tags to the cloud after the tags are created locally.
git push --tags
Tag Examples:
- RTM:
'ver-7.0.2' - Pre-Release:
'ver-7.0.3-alpha','ver-7.0.3-alpha.0','ver-7.0.3-beta.0','ver-7.0.3-prerelease.0', - Release Candidate: Pre-Release:
'ver-7.0.3-rc','ver-7.0.3-rc.0', - Continuous Build:
'ver-7.0.2'
Get-GitVersion Function
A PowerShell function that given a git semver compatible tag with at least three digits for .. or .., will return a compatible array of Microsoft matching AssumblyVersion, FileVersion, and PackageVersion strings.
function  Get-GitVersion
{
	param ( [string] $VersionInput, [int] $Count )

	$revision = $count
	$ver = $VersionInput.Replace("ver-", "")

	$va = $ver.Split(".")
	$major = $va[0]
	$minor = $va[1]
	# Visual Studio / MSBUILD - {major}.{minor}.{build}.{revision}
	# SEMVER - {major}.{minor}.{match}-{prerelease}+{metadata}

	# $va[2] can contain a - if using semver
	[bool] $isSemVer = $va[2].Contains("-")
	if ($isSemVer)
	{
		$pr = $va[2].Split("-")
		$build = $pr[0]
	}
	else {
		$build = $va[2]
	}

	$av = ("{0}.{1}.{2}.{3}" -f $major,$minor,$build,$revision)
	$fv = ("{0}.{1}.{2}.{3}" -f $major,$minor,$build,$revision)
	if (($Count -gt 0) -or ($isSemVer))
	{
		$pv = ("{0}.{1}.{2}.{3}" -f $va[0], $va[1], $va[2], $revision)
	}
	else
	{
		$pv = ("{0}.{1}.{2}" -f $va[0], $va[1], $va[2])
	}

	$Versions = @($av, $fv, $pv)
	return $Versions
}
Calling the function is a matter of gluing the elements together:
$versions = Get-GitVersion -VersionInput $tag -Count $count
- $versions[0] contains AssemblyVersion
- $versions[1] contains FileVersion
- $versions[2] contains PackageVersion
Test Samples
Below are several tag examples and what will be returned by the AssemblyVersion, FileVersion, and PackageVersions.
ag = ver-0.0.0; Count = 0
AssemblyVersion = 0.0.0.0
FileVersion = 0.0.0.0
PackageVersion = 0.0.0
====================
Tag = ver-7.0.2; Count = 0
AssemblyVersion = 7.0.2.0
FileVersion = 7.0.2.0
PackageVersion = 7.0.2
====================
Tag = ver-7.0.2; Count = 3
AssemblyVersion = 7.0.2.3
FileVersion = 7.0.2.3
PackageVersion = 7.0.2.3
====================
Tag = ver-7.0.2.1; Count = 3
AssemblyVersion = 7.0.2.3
FileVersion = 7.0.2.3
PackageVersion = 7.0.2.3
====================
Tag = ver-7.0.2-dev; Count = 0
AssemblyVersion = 7.0.2.0
FileVersion = 7.0.2.0
PackageVersion = 7.0.2-dev.0
====================
Tag = ver-7.0.2-dev; Count = 5
AssemblyVersion = 7.0.2.5
FileVersion = 7.0.2.5
PackageVersion = 7.0.2-dev.5
====================
Tag = ver-7.0.3-dev; Count = 3
AssemblyVersion = 7.0.3.3
FileVersion = 7.0.3.3
PackageVersion = 7.0.3-dev.3
====================
Tag = ver-7.0.2-1; Count = 0
AssemblyVersion = 7.0.2.0
FileVersion = 7.0.2.0
PackageVersion = 7.0.2-1.0
====================
Tag = ver-7.0.2-1; Count = 2
AssemblyVersion = 7.0.2.2
FileVersion = 7.0.2.2
PackageVersion = 7.0.2-1.2
====================
minver --default-pre-release-identifiers 'dev' --tag-prefix "ver-"
MinVer: Using { Commit: 87103c9, Tag: 'ver-7.0.2', Version: 7.0.2, Height: 38 }.
MinVer: Calculated version 7.0.3-dev.38.
Tag = 7.0.3-dev; Count = 38
AssemblyVersion = 7.0.3.38
FileVersion = 7.0.3.38
PackageVersion = 7.0.3-dev.38
====================
Dotnet MSBUILD Parameters
Now we can pass those parameters for the version information to the build
$AssemblyVersion = $versions[0]
$FileVersion = $versions[1]
$PackageVersion = $versions[2]
dotnet msbuild $Solution -p:Configuration="Release" `
-p:AssemblyVersion=$($AssemblyVersion) `
-p:FileVersion=$($FileVersion) `
-p:Version=$($PackageVersion)
Package Reference Changes
To have a project reference both a wildcard version, and a wildcard pre-release version, an additional specifier is needed.
To Reference only a wildcard published version, use a single wildcard character.
<PackageReference Include="subsystem-1.libA" Version="7.*" />
<PackageReference Include="subsystem-1.libA" Version="[7.*, )" />
To Reference both a wildcard published version, and a pre-release version, use a two wildcard characters with a hyphen '-' separating them. This will pick up the latest package available (published or pre-release).
<PackageReference Include="subsystem-1.libA" Version="7.*-*" />
<PackageReference Include="subsystem-1.libA" Version="[7.*-*, )" />
CI/CD Counters
Several systems provide a unique build counter that is triggered on each build.
Team City
Team City provides a build.counter value that is incremented each time a build is triggered. It can be reset or set to a specific number to start with, but always increments on each build (success or failure).
Configuring General Settings | TeamCity On-Premises Documentation (jetbrains.com) [8]
GitHub Actions
GitHub Actions provides an environment variable GITHUB_RUN_NUMBER that increments on each build. There does not appear to be a way to control it.
https://github.com/GitTools/actions [9]
When using GitHub Actions, the fetch-depth must be explicitly set so that the tags beyond the first commit will be available to the script.
steps:
      - uses: actions/checkout@v3
        with:
            fetch-depth: 0
GitHub Action Sample
A GitHub Action to invoke a powershell command
name: UX - Build and deploy to Azure Web App - tim-stanley-x

on:
  push:
    branches:
      - main
  workflow_dispatch:

jobs:
  build:
    runs-on: ubuntu-latest

    steps:
      - uses: actions/checkout@v3
        with:
            fetch-depth: 0

      - name: Set up .NET Core
        uses: actions/setup-dotnet@v3
        with:
          dotnet-version: '7.x'

      - name: PowerShell Build
        shell: pwsh
        run: |
          ./gitbuild.ps1

      - name: Upload artifact for deployment job
        uses: actions/upload-artifact@v3
        with:
          name: .net-app
          path: ${{env.DOTNET_ROOT}}/myapp
          if-no-files-found: error
Azure Pipelines
Azure has a Build.BuildNumber and within it a $(Rev:r) number.
Build.BuildNumber https://learn.microsoft.com/en-us/azure/devops/pipelines/build/variables?view=azure-devops&tabs=yaml [10] $(Rev:r) https://learn.microsoft.com/en-us/azure/devops/pipelines/process/run-number?view=azure-devops&tabs=yaml [11]
The Rev: value is incremented on each new day if using the default value. When a build starts, if nothing else in the build number has changed, the Rev integer value is incremented by one.
When using Azure Pipelines, the fetchDepth must be explicitly set so that the tags beyond the first commit will be available to the script.
Azure Pipelines Sample
steps:
- checkout: self
  fetchDepth: 0  # the depth of commits to ask Git to fetch, 0 = full depth, so we get tags.
  fetchTags: true

- task: PowerShell@2
  displayName: 'Build'
  env:
     Build.Agent: "AZURE"
     Build.Configuration: "Release"
     Build.PublishArtifacts: "true"
     Build.Branch: $(Build.SourceBranchName)
     Build.Azure.BuildNumber: $(Build.BuildNumber)
  inputs:
    filePath: "$(System.DefaultWorkingDirectory)/gitbuild.ps1"
    failOnStderr: true
    showWarnings: true
    pwsh: true # Use PowerShell.Core
PowerShell Script Sample
The powershell script gitbuild.ps1 referenced by the GitHub Action and AzurePipeline
function  Get-GitVersion
{
	param ( [string] $VersionInput, [int] $Count )

	$revision = $count
	$ver = $VersionInput.Replace("ver-", "")

	$va = $ver.Split(".")
	$major = $va[0]
	$minor = $va[1]
	# Visual Studio / MSBUILD - {major}.{minor}.{build}.{revision}
	# SEMVER - {major}.{minor}.{match}-{prerelease}+{metadata}

	# $va[2] can contain a - if using semver
	[bool] $isSemVer = $va[2].Contains("-")
	if ($isSemVer)
	{
		$pr = $va[2].Split("-")
		$build = $pr[0]
	}
	else {
		$build = $va[2]
	}

	$av = ("{0}.{1}.{2}.{3}" -f $major,0,0,0)
	$fv = ("{0}.{1}.{2}.{3}" -f $major,$minor,$build,$revision)
	if (($Count -gt 0) -or ($isSemVer))
	{
		$pv = ("{0}.{1}.{2}.{3}" -f $va[0], $va[1], $va[2], $revision)
	}
	else
	{
		$pv = ("{0}.{1}.{2}" -f $va[0], $va[1], $va[2])
	}

	$Versions = @($av, $fv, $pv)
	return $Versions
}

################################
# Calculate the version numbers from git tags and commits
################################
# obtain the latest git tag
$tag = git tag --list ver-* | Select-Object -Last 1
[int] $count = 0
if ($null -ne $tag)
{
	# calculate how many commits since the tag
	$hash = git show $tag --format="%H" -s | Select-Object -Last 1
	$line = ("git show {0}..HEAD --format=""%H"" -s" -f $hash)
	$items = Invoke-Expression $line
	if ($null -ne $items)
	{
		$count = $items.Count
	}

	Write-Host ("Tag={0}" -f $tag)
	Write-Host ("Count={0}" -f $count)

	$versions = Get-GitVersion -VersionInput  $tag -Count $count
	$AssemblyVersion = $versions[0]
	$FileVersion = $versions[1]
	$PackageVersion = $versions[2]
}
else # No tag found, set some defaults
{
	Write-Host("No tag found, using defaults")
	$AssemblyVersion = "0.0.0.1"
	$FileVersion = "0.0.0.1"
	$PackageVersion = "0.0.0.1"
}

Write-Host ("FileVersion = {0}" -f $FileVersion)

$p = "./artifacts/logs/"
if (-Not (Test-Path -Path $p))
{
    $d = New-Item -ItemType Directory $p
}

################################
# Restore
################################
Write-Host ("dotnet restore")
dotnet restore ./Source/ContentEngine.Mvc.sln `

################################
# Build
################################
Write-Host ("dotnet msbuild")
dotnet msbuild -p:Configuration=Release ./Source/ContentEngine.Mvc.sln `
    -p:AssemblyVersion=$($AssemblyVersion) `
    -p:FileVersion=$($FileVersion) `
    -p:Version=$($PackageVersion) `
    -p:AllowedOutputExtensionsInPackageBuildOutputFolder=\""".dll;.exe;.winmd;.json;.pri;.xml\""" `
    -p:IncludeSymbols=true `
    -p:SymbolPackageFormat=snupkg `
    -nodeReuse:false `
    -bl:"./artifacts/logs/ContentEngine.Mvc.binlog"

# set the output directory for publish
Write-Host ("env:DOTNET_ROOT = {0}" -f ${env:DOTNET_ROOT})
if ($null -ne ${env:DOTNET_ROOT}) {$d = ${env:DOTNET_ROOT}}
else {$d = $PWD}

################################
# Publish
################################
Write-Host ("dotnet publish")
dotnet publish --configuration Release ./Source/ContentEngine.Mvc/ContentEngine.Mvc.csproj -o $d/myapp --no-build
Update
Because git tags are associated with a changeset number and not a particular branch, this strategy works for a single branch. To handle multiple branches searching for a specific tag pattern unique within each branch. For example
- branch: main, search for the tag ver-1.0.0
- branch: releases/101, search for the tag ver-1.0.1
- branch: releases/200, search for the tag ver-2.0.0
References
- [1] https://learn.microsoft.com/en-ca/dotnet/standard/library-guidance/versioning#version-numbers
- [2] https://learn.microsoft.com/en-us/nuget/create-packages/prerelease-packages
- [3] https://semver.org
- [4] https://www.nuget.org/packages/MinVer
- [5] https://www.nuget.org/packages/minver-cli
- [6] https://github.com/GitTools/GitVersion
- [7] https://github.com/AArnott/Nerdbank.GitVersioning
- [8] https://github.com/GitTools/actions
- [9] https://www.jetbrains.com/help/teamcity/2022.10/configuring-general-settings.html#ConfiguringGeneralSettings-buildCounter
- [10] https://learn.microsoft.com/en-us/azure/devops/pipelines/build/variables?view=azure-devops&tabs=yaml
- [11] https://learn.microsoft.com/en-us/azure/devops/pipelines/process/run-number?view=azure-devops&tabs=yaml
Related Items
Building an Azure Dev Test Lab - Networking
This is part of a series on Building an Azure Dev Test Lab.
There are many things that can be done in Azure without setting up Azure Networking. But, there are also many reasons to setup a private Azure network. This article is a summary of what Azure Services are required to get Azure networking in place.
- What Is Azure Networking?
- Azure Networking Not Required
- Azure Networking Required
- Azure Active Directory Domain Services (AADDS)
- Azure Virtual Network
- Azure Bastion
- Azure Virtual Machines
- Azure VPN Gateway
- Azure Firewall
- Fortinet FortiGate Virtual Appliance Firewall
- Azure Front Door
- Lab Scenarios
- References
What Is Azure Networking?
In the context of this article, Azure networking refers to the Azure systems and services that are required for one Azure service or virtual machine to communicate to another Azure service or virtual machine over a private (not public) network.
Azure Networking Not Required
You can do any of the following without any private Azure networking:
- Authenticate users using Azure Authentication for Office 365, Azure Devops, and external SAML authentication.
- Push code to/from Azure Devops repositories.
- Push deployments from Azure Devops to Azure Services / Websites.
- Host Azure Websites on the Internet.
Azure Networking Required
Your Azure system may be a candidate for a private Azure network, if you need any one of the following:
- Join Azure VM's to an Azure Active Directory Domain Service. You'll need AADDS.
- You want VM to VM traffic on a private network. You'll need an Azure Virtual Network.
- You want a VNET / VLAN. You'll need an Azure Virtual Network.
- You want an external VPN into a private Azure network. You'll need and Azure Gateway or a FortiGate Virtual Appliance Firewall
- You want a WAN VPN from Azure to your premises network. You'll need and Azure Gateway or a FortiGate Virtual Appliance Firewall
- You want to run legacy applications in the cloud (legacy equates to Windows Services, Websites, or other Windows applications not designed for the cloud).
Azure Active Directory Domain Services (AADDS)
AADDS [1] is the fundamental building block for an Azure Dev Test lab. It provides the "Domain Controller" functionality in Azure (but it's not really a Domain Controller). AADDS allows you to use managed domain services—such as Windows Domain Join for VM's, group policy, LDAP, and Kerberos authentication (simple sign-in using Azure AD credentials).
Steps to Create AADS Services
- Create a subscription and resource group to assign to the AADDS.
- Define region (CENTRAL-US, EAST-US, WEST-US, etc.).
- Pick SKU: Standard, Premium, Enterprise (Premium, Enterprise allow resource domains).
- Create Azure AD Domain Services ( azure.domain.com, or aadds.domain.com, but could be domain.com).
- Add a new network, aadds-vnet (must be 10.0.0.0/8, 172.16.0.0/12, or 192.168.0.0/16).
- Create new group AAD DC Administrators.
- Configure DNS (after AAADS allocated) which will configure DNS for above VNET to point to (2) AD services DC's.
- Must have Azure AD Cloud Sync password write-back enabled.
- Enable Azure AD Password sync to enable password hash synchronization.
For a more detailed explanation on setting up AADS Services, refer to this youtube video:
Lets Get One Thing Straight | Azure AD Domain Services
Azure Virtual Network
Azure Virtual Network [2] allows you to create your own private network in the cloud. Just like in your on-premises network, there are numerous security reasons you don't want everything you do on the public internet. Azure Virtual Network provides:
- IPSEC or VPN / WAN from your on-premises network to Azure.
- Your own DNS services.
- Your own IP addresses.
- Network Address Translation (NAT)
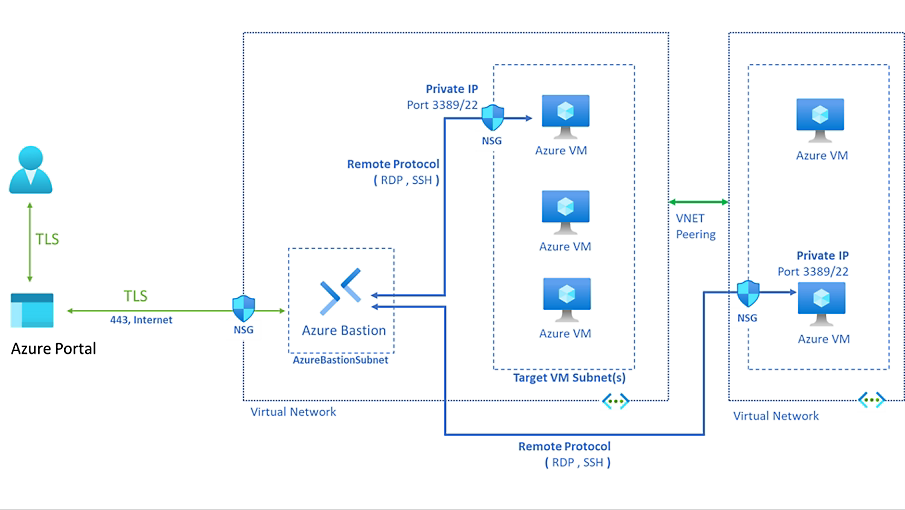
Azure Bastion
Azure Bastion [3] provides the services to allow remote desktop connections to an Azure VM, without requiring a VPN, or without requiring the RDP port 3389 to be exposed on the open internet. VPN's can cut bandwidth by 30-40%.
Azure Virtual Machines
Azure Virtual Machines [4] allow you to get your legacy applications in the cloud. These are not your typical VM's. Azure VM's can provide:
- up to 416 vCPUs
- up to 12 TB of memory
- up to 3.7 million local storage IOPS per VM.
- up to 30 Gbps Ethernet.
- up to 200 Gbps InfiniBand internet.
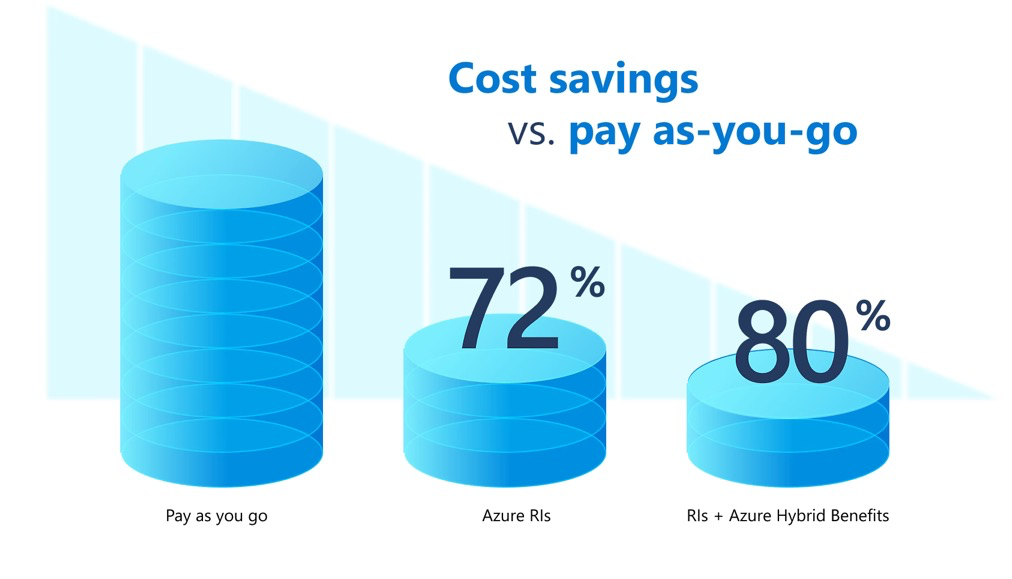
Linux VM's will be cheaper than Windows VM's. Reserved Virtual Machines will be cheaper than Pay as you go.
 Azure Dev-Test box [5] provides another VM capable of running a developer class workstation. A Dev-Test box template can be setup and configured once and then developers can pull from a pool of boxes. A Dev-Test lab can be configured to shut down unused VM's during certain hours to minimize expenses.
Codespaces [6] also provides another VM capable of running developer scenarios. Azure Codespaces have been migrated to GitHub Codespaces [6]. GitHub uses GitHub Codespaces [7] to develop GitHub. In under 10 seconds, you can spin up a Codespace. If your application development process can use Visual Studio Code, Codespaces eliminates the need for developer machine by running a virtual developer machine in the cloud. It's significantly cheaper than a full private network.
Azure VPN Gateway
Azure VPN Gateway [8] provides the ability create a site to site IPSEC VPN or a point to site VPN from anywhere to your Azure network.
Azure Firewall
Azure Firewall [9] protects your Azure Virtual Network resources in the cloud. It protects your Azure private network just like an on-premises firewall would.
Fortinet FortiGate Virtual Appliance Firewall
If you have Fortinet firewalls and routers, then it may be easier to use a custom VM and purchase a VM version of the a FortiGate Virtual Appliance [10]. The Fortigate FG-VM02V VM support 2 vCPU cores and supports 15 Gbps bandwidth. I've used the FortiGate 60E at multiple sites for years. It provide a great Firewall, and stellar support. The Firewall keeps your private network private.
Azure Front Door
Azure Front Door [11] provides a Content Delivery Network (CDN), Load balancing and failover, Web Application Firewall, DDOS and bot protection. If your running a production website, Azure Front Door can provide the necessary protection. CloudFlare [12] is another vendor that can provide website and API protection.
Lab Scenarios
That's a lot of services for Azure Networking. Let's take a look at some scenarios and see what is required. I'm going to preface this with Microsoft is continually changing what is present in Azure., so this information is based on Q1 2023 Azure information.
LAB 1 Public Website / API Development
This would be a thin Azure system and would include the following:
- Azure Devops Git repositories for code (requires a Visual Studio or Stakeholder license)
- Azure Pipelines (included with Azure Devops)
- Visual Studio code (free)
- Azure Dev App Services / Websites
- Azure Test App Services / Websites
This configuration does not require any private Azure networking.
LAB 2 Private Web Dev / Test APIs
This would be a private network Azure system and would include the following:
- Azure Devops Git repositories for code (requires a Visual Studio or Stakeholder license)
- Azure Pipelines (included with Azure Devops)
- Private Dev Server API's (Azure Websites) running on Azure AADS account.
- Private Test Server API's (Azure Websites) running on Azure AADS account.
- Developers have an AD joined machine and account.
Since this configuration is a private network, an Azure network is required. Typical services would include:
- Azure Active Directory Domain Services (AADDS)
- Azure Cloud Sync (to mirror AD accounts to Azure).
- Azure Virtual Network with private IP's.
- Azure Websites assigned a private IP.
- Azure Front Door, or Azure Firewall
LAB 3 Private Web Dev / Test APIs with Azure SQL
This would be a private network Azure system and would include the following:
- Azure Devops Git repositories for code (requires a Visual Studio or Stakeholder license)
- Azure Pipelines (included with Azure Devops)
- Private Dev Server API's (Windows VM, Linux VM's)
- Private Test Server API's (Windows VM, Linux VM's)
- Developers have an AD joined machine and account.
- Dev Azure SQL database instances.
- Test Azure SQL database instances.
- Developers use private Azure VM's to develop / test.
- Site to Site VPN (WAN)
Since this configuration is a private network with VM's, an Azure network is required. Typical services would include:
- Azure Active Directory Domain Services (AADDS)
- Azure Cloud Sync (to mirror AD accounts to Azure).
- Azure Virtual Network with private IP's.
- Azure VM's assigned a private IP.
- Azure Bastion for remote VM access.
- Azure SQL instances assigned a private IP.
- Azure Gateway
- Azure Firewall or FortiGate Virtual Appliance Firewall for Site to Site VPN.
📝 Note: If you have a need for multiple deployment slots (production, staging, development) other than the default production slot, you need to have a Standard, Premium, or Isolated plan [13]. You can work around this limitation by having two individual sites, and manually changing the DNS records to switch between the sites.
References
- [1] https://azure.microsoft.com/en-us/products/active-directory/ds
- [2] https://azure.microsoft.com/en-us/products/virtual-network/
- [3] https://azure.microsoft.com/en-us/products/azure-bastion/
- [4] https://azure.microsoft.com/en-us/products/virtual-machines/
- [5] https://azure.microsoft.com/en-us/solutions/dev-test/#overview
- [6] https://azure.microsoft.com/en-us/updates/begin-migrating-your-codespaces-to-github-codespaces/
- [7] https://github.blog/2021-08-11-githubs-engineering-team-moved-codespaces/
- [8] https://azure.microsoft.com/en-us/products/vpn-gateway/
- [9] https://azure.microsoft.com/en-us/pricing/details/azure-firewall/
- [10] https://www.fortinet.com/products/private-cloud-security/fortigate-virtual-appliances
- [11] https://azure.microsoft.com/en-us/products/frontdoor
- [12] https://www.cloudflare.com
- [13] https://learn.microsoft.com/en-us/azure/app-service/deploy-staging-slots
Related Items
Building an Azure Dev Test Lab - Data Centers
This is part of a series on Building an Azure Dev Test Lab for software development.
Azure has Data Centers located all over the globe. But not all Data Centers have all the same features or price structure. Before you begin to setup Azure services, make sure the Data Center you select for your Azure Products and Services support what you will need and that you know the pricing.
Where are Azure Data Centers Located?
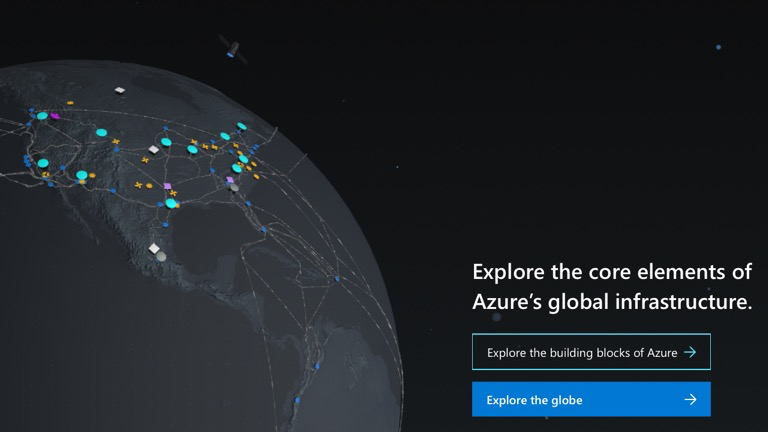
The Microsoft Azure Global Infrastructure site [1] lists the Data Centers Azure provides. It is important to do a little and planning to know all the services you need from a data center before you begin to set something up.
Explore the Azure Global Infrastructure site to get more details.
Compliance and Data Residency
Knowing what specific country or standard compliance rules are required for storage, and data compliance are important for production data, but rarely so for a dev test lab. Azure Compliance [2] and Data Compliance [3] lists over 90 country specific compliance guidelines. This can be important when trying to conform to GDPR or other country specific data laws and guidelines.
Service Availability
Each Azure Data Center provides a different range of services. For example, the Central US and East US regions support Zonal DR with Azure Site Recovery , but East US and North Central US do not. Make sure that all the services you are planning on are supported within the Data Center where you plan on deploying.
Pricing
Azure Pricing [4] for example lists that West US 3 does not have an App Service F1 Free or D1 Shared plan option whereas West US 2 does.
Linux or Windows
Azure Pricing for Windows and Linux can vary significantly.
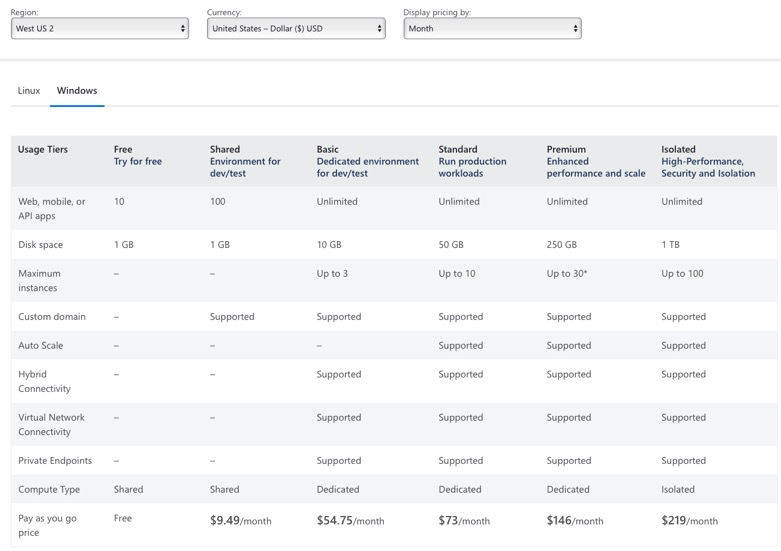
Azure App Service pricing for Windows (March 2023):
Azure App Service pricing for Linux [5] (March 2023):
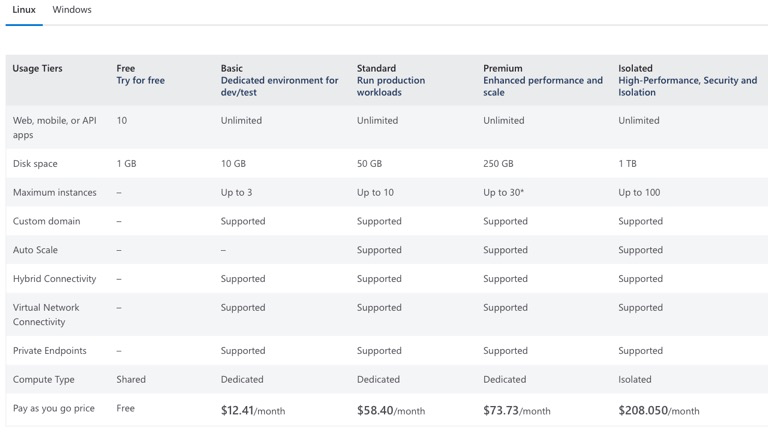
For a Dev Test Lab, a Linux solution is going to be cheaper than a Windows one.
- Basic dev/test Linux: $12.41 / mo.
- Basic dev/test Windows: $54.75 / mo.
References
- [1] https://azure.microsoft.com/en-us/explore/global-infrastructure/geographies/#overview
- [2] https://azure.microsoft.com/en-us/explore/trusted-cloud/compliance/
- [3] https://azure.microsoft.com/en-us/explore/global-infrastructure/data-residency/#overview
- [4] https://azure.microsoft.com/en-us/pricing/details/app-service/windows/
- [5] https://azure.microsoft.com/en-us/pricing/details/app-service/linux/